|
|

|
|
|
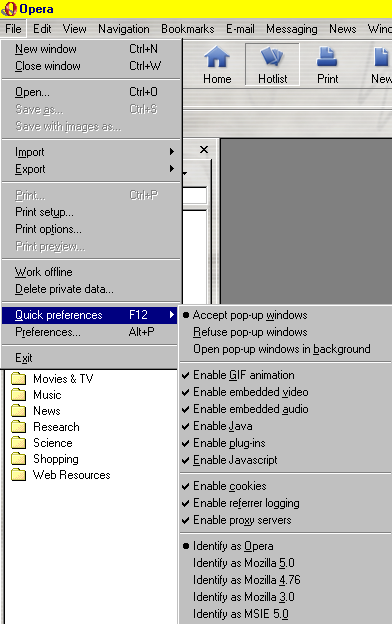
Quick Links This Page: | Home Page & Disconnect Options | Filtering, Cache Clearing & Cookies | E-Mail Setup & Import Options | Newsgroups | Basic Navigation | Warning: Opera 6 does not support SMTP authentication. If your area requires SMTP authentication then you will need to use a different program for sending e-mails. Opera can be setup to use a different program such as Netscape Messenger, Outlook Express and just about any other major mail program. Opera is a rival to Netscape and Internet Explorer that is used by many people worldwide. You can setup your own "preferences" or individual settings by clicking the "File" menu in the top left corner as shown below. The "Quick Preferences" have a few convenient options such as the ability to enable "cookies" on your program. Cookies are important to many websites. For example, if your favorite home page allows you to customize its look to do things like check the weather for specific cities then you must have cookies enabled for this to work. The vast majority of the options that you will need are in the regular "Preferences" option just below the "Quick Preferences" option. Choose that option to continue. You can also click the "Alt" key and "P" on your keyboard at the same time to get these options.
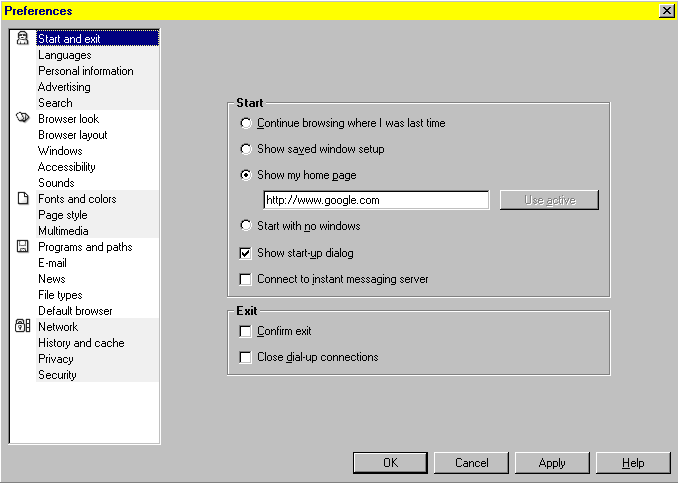
Home Page Settings & Automatic Disconnect Options: When you open the preferences window for Opera, you will see the following page where you can set your "home page" on the browser. The last checkbox gives you the option to automatically disconnect from the Internet when you close your Opera program. Just click on the little box to add or remove the checkmark. The list in the box on the left contains a bunch of other options. You start in the "Start and exit" options at the top to see the home page options, etc. Click on the "E-mail" option just below "Programs and paths" to setup your e-mail as covered a little further below.
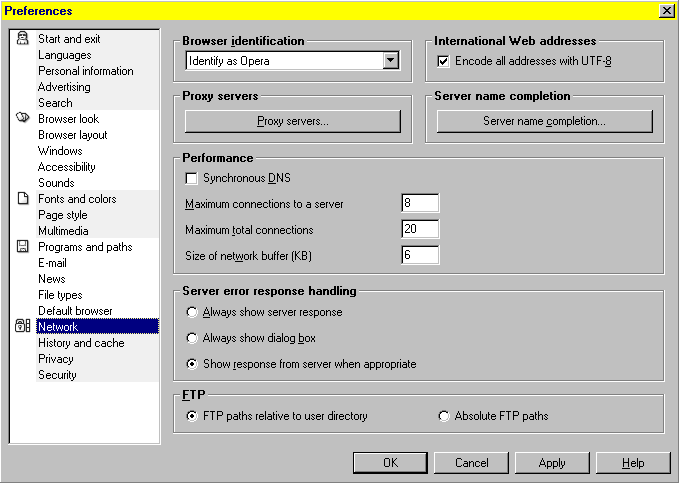
Filtering, Cache Clearing & Cookies: <skip to cache & history clearing> <skip to cookies section> Inside the Preferences window, choose the "Network" option as shown below to setup your proxy server if you are filtering & blocking adult content. The Network section includes a button that says "Proxy Servers" that you will need to click.
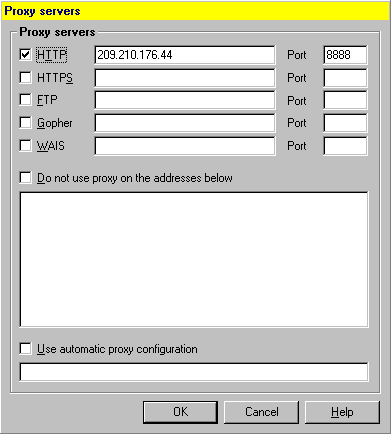
Once you've clicked the proxy servers button, you will see the following window. ISPs can only filter HTTP so click to put a checkmark in the first box for HTTP. The proxy filter address is available from your ISP. Leave everything else blank and click OK then continue with the instructions for cache clearing below. Please note that enabling the HTTP proxy server will block all adult websites. If you're worried about the kids bypassing this setting then get Proxy Watch or Global Safe from your ISP Help Desk. Those programs will password protect and lock this setting so that it can't be disabled without knowing a password that you choose when installing the program.
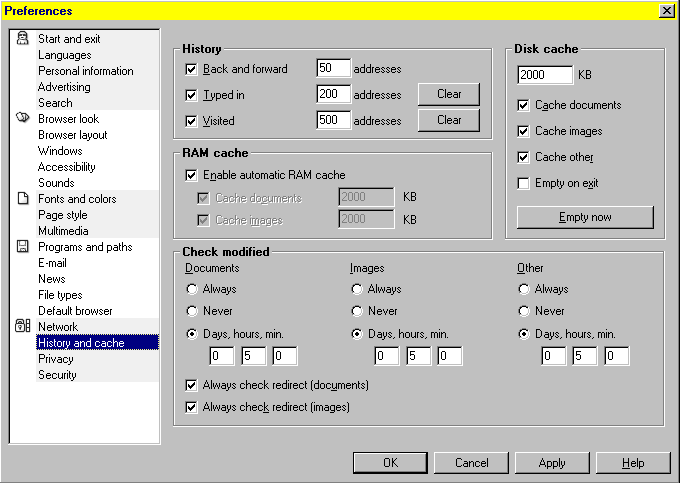
Clearing The Cache & History: You're not finished setting up the filtering. You still need to clear your cache and surfing history. Click both of the "Clear" buttons. You also need to click the "Empty now" button.
Cookies: The Internet uses something called "cookies" to recognize you on different websites. In many cases, you can disable them from being used on your computer. However, if you are using a website that remembers individual settings such as the weather for certain cities then you will need to have cookies enabled. ISP dynamic portals are one example of websites that need this to work. Even this tutorial relies on cookies to get you detailed setup instructions. You enable cookies in the "preferences" by clicking on the "Privacy" option on the left as shown below. Click to add a checkmark in the box for enabling cookies. Make sure that there isn't a checkmark in the box for throwing away cookies on exit.
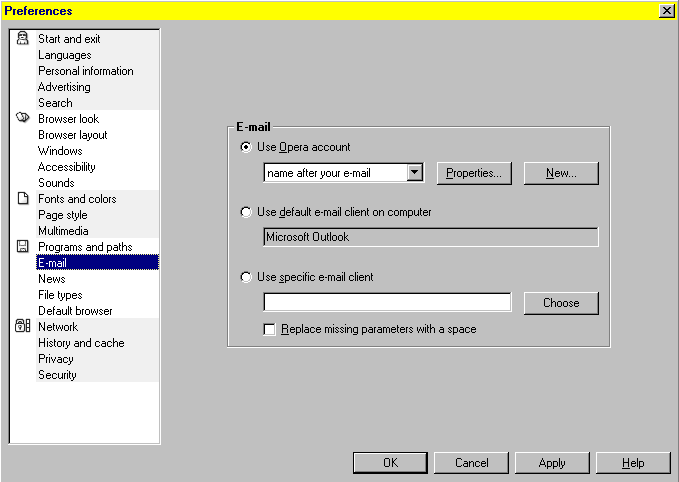
E-Mail Setup Including Importing Old Mail From Another Mail Program: <click here to skip to the import section> You can use an "Opera account" to send and receive e-mail but only if your ISP doesn't use something called "SMTP Authentication" which the current version of Opera (Version 6.0) does not support. The people at Opera are working on adding this feature which is being used by most ISPs to prevent spamming where people send unsolicited e-mails to strangers. If your ISP doesn't use SMTP authentication then it will soon. Almost all ISPs are switching to this new protection from spamming. If you can't use Opera for e-mail (or don't want to) then choose your default e-mail client in the second option. If your prior e-mail program isn't already on the computer then choose the third option to point it to your e-mail program such as Outlook 2000 or Outlook Express. (Click here for instructions to setup other e-mail programs.) If you are going to use Opera for e-mail then click on the "New" button to set it up on your computer. You can also check the settings on your e-mail account by clicking the "Properties" button. If you have more than one e-mail account setup then be sure that the first box where it says "name after your e-mail" in the picture below has the e-mail account in it. If not, click the little black down arrow. You will see each e-mail account that you've got setup in Opera. Choose the one that you want to edit. Note: Simply creating an e-mail account or changing its password in Opera isn't enough. You also need to contact your ISP to have them create the e-mail account or change the password on their mail system.
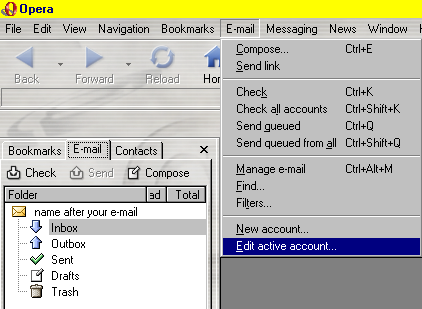
Before we get to the new account and edit account options, it is worth noting that you can also get to them by clicking the "E-mail" menu as shown below.
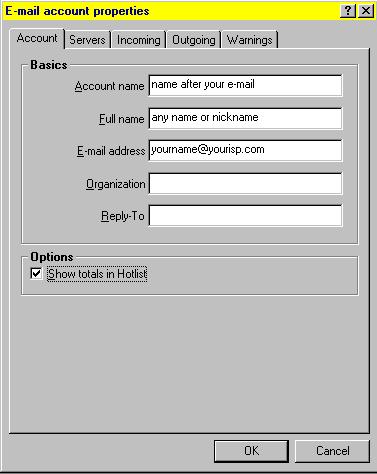
The only difference between the "new" option and the "edit" option is whether there will be anything in the boxes. The "edit" option will have information in the boxes while the "new" option will have blank boxes. The pop-up window will look like the one below. It will start in the "Account" tab. Name the account after your e-mail identity so that you can tell it apart from your other e-mail accounts. Your "Full name" can be a nickname or a fake name but your e-mail address box needs your full e-mail address. Don't worry about the organization and reply-to boxes. However, you will probably want a checkmark in that last little box for showing totals in the Hotlist. This will tell you how many e-mails are in your mailboxes. Don't hit the OK button. We need to check some other things. Click the "Servers" tab at the very top and the window will change to give you more options.
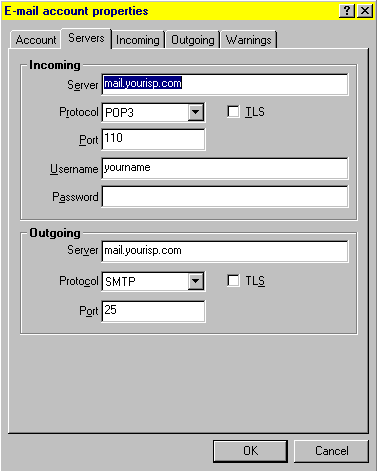
Your "Servers" settings
are very important. You will not be able to send and receive e-mail if these
settings are wrong or empty. Please note that these settings are split between
"Incoming" settings at the top followed by "Outgoing"
settings at the bottom.
Be sure to leave the incoming Protocol set for POP3 and the outgoing protocol set for SMTP as shown below. If these are wrong on your computer then click the little black arrow at the end to choose the right one. Do not put in a checkmark for TLS. Leave the ports alone. The incoming port should always be 110 and the outgoing port is always 25 or it won't work. The "Username" box isn't the username that you use to connect to the Internet although it could be the same. The username for e-mail is the first part of your e-mail address. For example, santa@northpole.com would put santa for the username and mail.northpole.com for the mail servers. As for the password, be sure to use the password for your particular e-mail account. Click the "Incoming" tab at the top when ready.
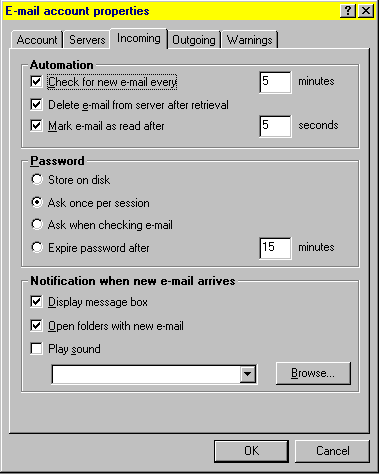
Most of these options are quite optional. The first two are important. Make sure that you have a checkmark in the top two boxes so that your e-mail program will automatically check for new mail and delete old e-mails from your ISP's computer after retrieval. Don't worry about losing the e-mails since you will have already downloaded them to your own computer. Tip: Don't set the "check for new e-mail" option to less than 5 minutes unless you have a pretty strong CPU on your computer. If your computer is constantly checking e-mails then this will take away from performance on your other programs including surfing the web. Click the "Outgoing" tab at the top when ready.
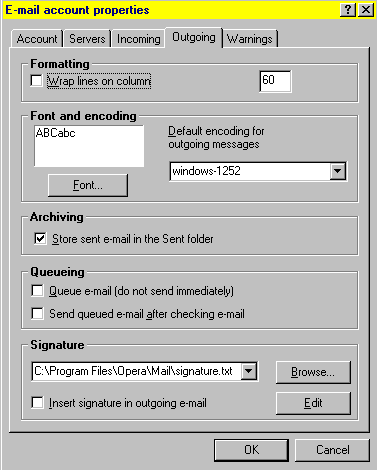
The outgoing options don't matter that much but we do recommend that you be careful with the queuing options. This tells the program to not send your e-mails right away when you try to send them. Most people prefer not to put a checkmark into those options so that mail gets sent immediately if you are connected to the Internet. The "signature" option is pretty popular. A signature is wording or information that gets automatically included at the end of every e-mail. Many people have signatures which automatically include their name, phone number and/or e-mail address at the end of each message. If you want to do this then click to put a checkmark in the "Insert signature" option at the bottom after clicking the "Edit" button to create the signature.
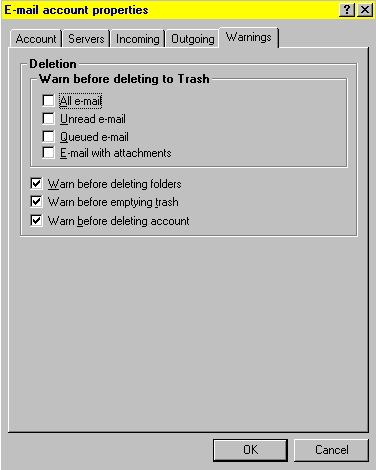
The "Warnings" tab has options that you can choose to suit your needs. Once done, click the OK button and connect to the Internet to send & receive e-mail.
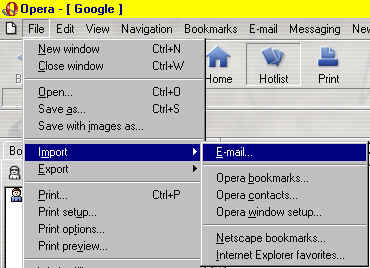
Importing Old E-Mails, Addresses & Settings From Another Mail Program On Your Computer: You can "import" the mail settings, address book, old e-mail messages from another mail program on your computer to Opera. Just click the "File" menu at the top. Put your pointer over the "Import" option and a window will pop-up to the right. Click where it says "E-mail" as shown below.
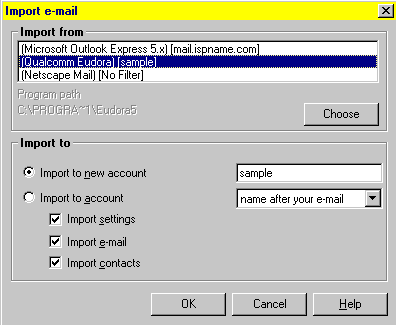
The top box will list each e-mail program setup on your computer. Click to highlight the one that has your old e-mail material. (Don't click the "Choose" button.) Choose the "Import to new account" option if you don't already have an account setup in Opera. Otherwise, choose the "Import to account" option and make sure that the box just to the right has your Opera e-mail account selected where it says "name after your e-mail" in the window below. You can choose by clicking the little black arrow to the right of the box. Depending on the capabilities of your old e-mail program and its settings, you may get one or all of the following options: settings, e-mail and/or contacts. Choose the ones that you want to migrate or "import" to Opera then hit the OK button.
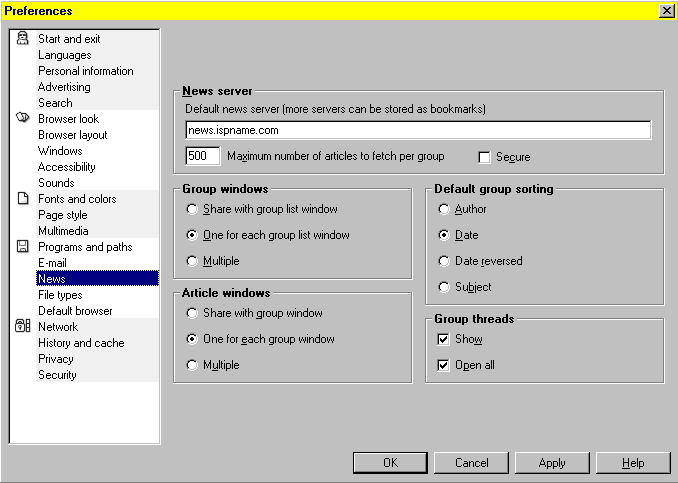
Setting Up Newsgroups: Newsgroups are like bulletin boards on the Internet. They cover a wide variety of topics. Most people don't use them but you can use them with our ISP. Just click the File menu and choose Preferences then click the News option as shown below. The first box for the "Default news server" is most important. The news server address is usually something like news.ispname.com. The other settings are flexible. Just do not put a checkmark in the "Secure" box!
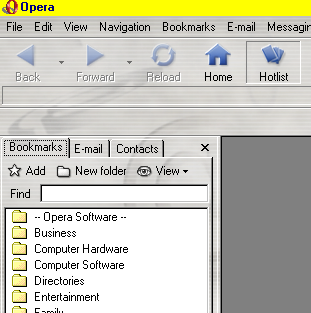
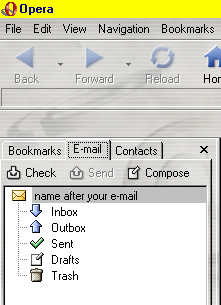
Basic Navigation In Opera: It's pretty easy to navigate through Opera. You should see the following tabs: Bookmarks, E-mail & Contacts. If you can't see them then click the "Hotlist" button shown below.
The bookmarks are your favorite websites. If you go to a website that you want to easily revisit then click the Bookmarks menu at the top and choose the option to add the bookmark. This will place a convenient link in the Bookmarks section.
The E-mail tab is where you check and send new e-mails. Click where it says "Check" to see if you have new messages. Click where it says "Compose" to write a new e-mail. When you've finished writing the message, click the "Send" option to send it. Don't forget that you have to be connected to the Internet with a phone line before you can send or receive e-mail!
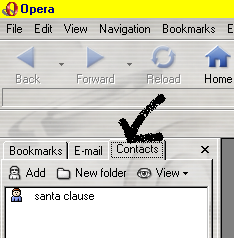
The "Contacts" section is like an address book. Click where it says "Add" to put in the name and e-mail address of people that you want to e-mail often. For example, the following screen shot has Santa in the address book. Double-clicking on that listing will automatically cause a new blank e-mail to pop-up with Santa's e-mail address already in the address box.
|

