|
|

|
|
|
Quick Links: | Navigation Settings | Mail Settings | Profile Manager | Proxy Filtering, Cache & History Clearing | Netscape Messenger | News Settings | Java & Cookies | Zen Netscape: Edit -> Preferences (Note: Click here for the Macintosh version of Netscape) Welcome to the Netscape Communicator 4.7 screen shot page for PC operating systems. Almost everything important is accessed through the Edit Menu -> Preferences section. The drop-down directories on the left include a Navigation, Mail and Advanced section. Clear the cache & history in the Navigation and Advanced sections. The Navigation section is also where you set Netscape's home page. Set the Proxy settings in the Advanced section. Each Netscape profile can only have a single e-mail address associated with it. As such, you will need to use the Profile Manager in order to configure Netscape to check multiple e-mails for one or more users. This is the main area that is not configured from the Edit -> Preferences section. See the profile manager section for more details.
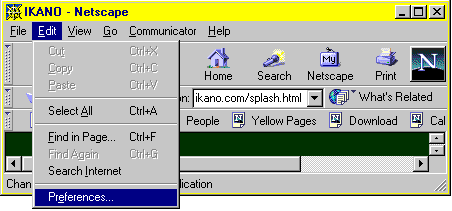
Netscape Navigation Settings Everything but the Profile Manager is configured by clicking the Edit menu and choosing Preferences as shown below. <next: setting the home page, etc.> <skip to e-mail settings>
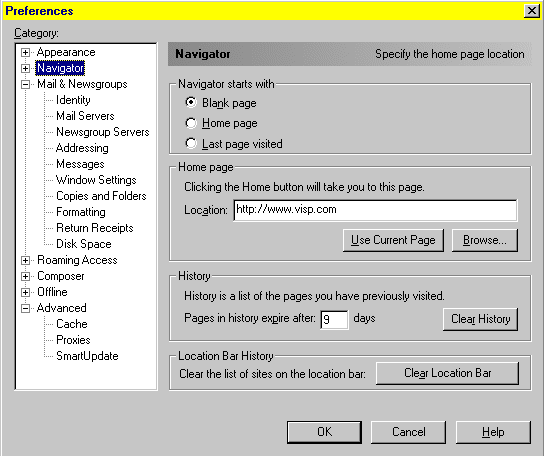
The preferences window always opens to the navigator category on the left as pictured below. This is where you set the home page. You also clear the history and location bar in this window if you are configuring or troubleshooting the proxy filter. <next: mail settings> <return to top for more options>
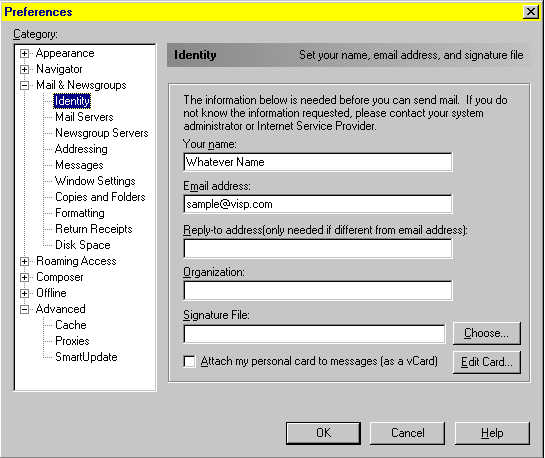
Mail Server Configuration: If you aren't already in the preferences section of Netscape then click the edit menu at the top and choose preferences. <click here if you can't find that> You will get the window pictured below. Click the plus sign (+) sign to the left of Mail & Newsgroups to configure the mail. Highlight "identity" to see the window below. The "your name" box is what people will see as the sender when you send e-mail. This does not have to match their e-mail username to work. Input the e-mail address. Make sure that you do not add any spaces or spell out "at" instead of "@" because some people will do that. You can leave the other boxes empty. <next: highlight mail servers>
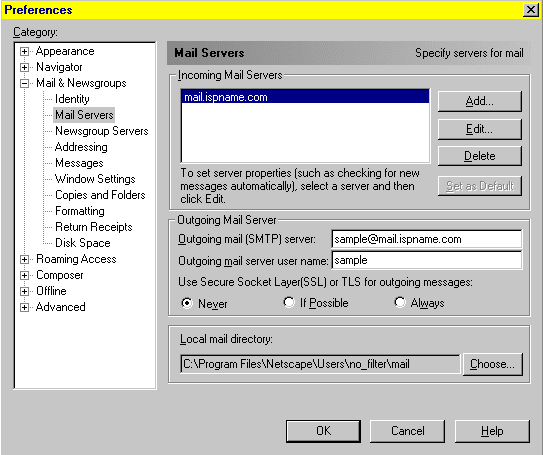
Click to highlight "mail servers" to see the next screen. This screen may vary with older versions of Netscape Communicator but they will essentially be the same. Netscape 4.X can only handle one e-mail account per profile. Thus, you will not be able to setup more than one incoming mail server. Delete any old settings or click the edit button to update an old setting. The incoming mail server usually follows the format of mail.ispname.com.The outgoing mail server usually follows the format of name@mail.ispname.com. Make sure that the "use SSL" option is set for "never" or they won't be able to connect to our mail server. <next: add/edit buttons>
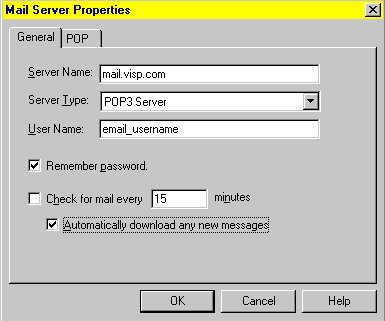
Whether you "add" a new mail account or "edit" an old one, you will still see the screen below. The server type is always POP3. Don't let customers set the check for new messages time frame to under five or ten minutes. Otherwise, there computer will be constantly checking the e-mail and their computer performance will degrade from all of the extra system overhead. <next: POP tab>
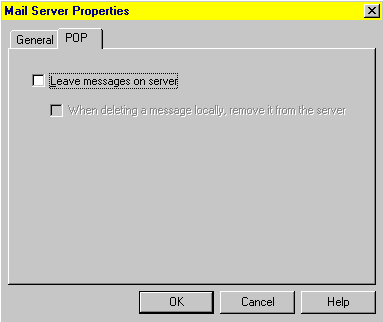
If you select the "POP" tab then you get an option to leave messages on our mail server. This is generally a bad idea. Customer e-mail folders are limited to 10 MB. Their e-mail performance will also "bog down" if there is a lot of old mail in their directory. Also, there is a chance that Netscape Messenger will mistakenly see old messages and assume that there are no new messages. [Outlook Express does this.]
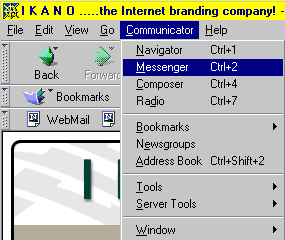
That's it. The e-mail is setup. Be sure to tell customers to click the Communicator menu and choose Messenger to do their e-mail. Click here for more screen shots specific to Netscape Messenger. <next: proxy filtering> <return to top for more options>
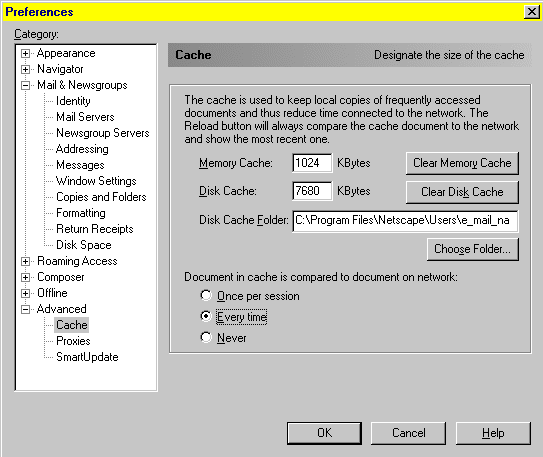
Proxy Filtering, Cache Clearing & History Clearing: Before configuring or troubleshooting someone's proxy filtering, be sure to clear the memory cache and clear the disk cache. This will remove any smut or history links for stuff that has already been downloaded to the computer. You perform this step by clicking the plus sign to the left of the "advanced" category and then highlighting "cache" as shown below.
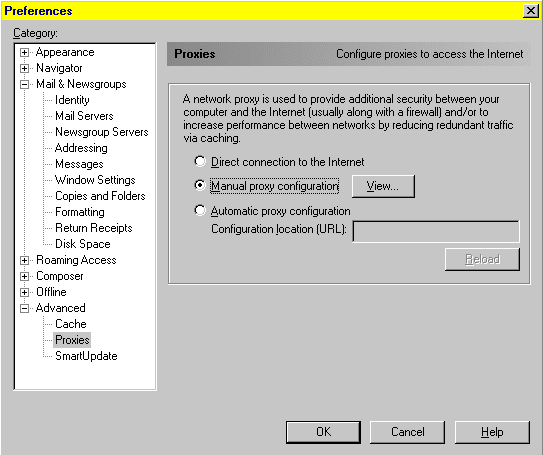
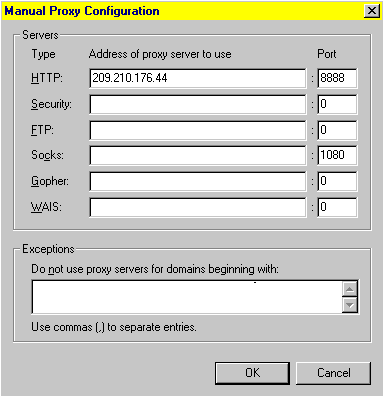
The proxies sub-category of the advanced section of Netscape preferences is where you go to configure a proxy server. Be sure to turn any Global Safe or Proxy Watch monitoring "off" before changing these settings. Put a bullet mark in the "manual proxy configuration" option then click the "view" button to set the proxy address. That window will be shown after the following window. <next>
We only have an HTTP proxy. We don't filter e-mail, ftp, etc. It is optional whether you want to use this filtering. The HTTP proxy acts as a guard to prevent access to questionable or undesirable material on the Internet. If needed, you can get Proxy Watch or Global Safe from your ISP's help desk to lock down this proxy setting so that the kids can't bypass it. Only put in a manual HTTP Proxy address if you want to block websites with adult material. The proxy filter address is available from your ISP.
You still need to go to the Navigator category (as pictured below) to hit the "clear history" and "clear location bar" buttons. Otherwise, any adult content that is already downloaded to the computer will still be visible. <next>
They're setup for filtering. Turn any Global Safe or Proxy Watch monitoring "on" (if applicable) and reconnect to the internet. [They must reconnect if they were already connected.] <next: profile manager> <return to top for more options>
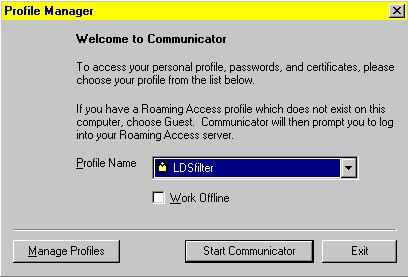
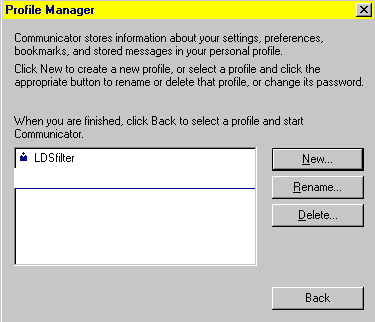
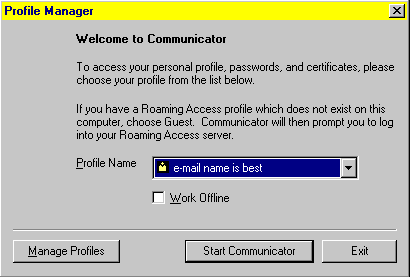
Profile Manager: Each Netscape profile can only have one e-mail account. You can setup multiple profiles to cover all of a family's e-mail accounts. The profile manager will come up automatically when there is more than one profile setup already. If the profile manager is already setup then you will see the picture below. Choose a profile or click the "manage profiles" button to add, delete or edit profiles. <next: forcing open the profile manager>
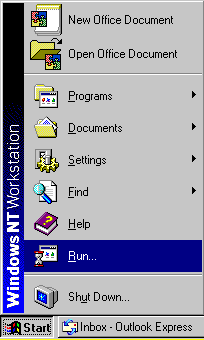
In some cases, you may need to open the profile manager manually. The easiest way to do this is to click the start button and choose "run" as pictured on the third screen shot below.
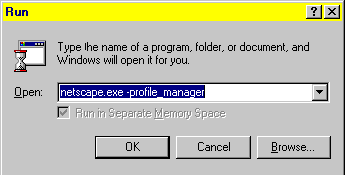
For Win9X (and possibly Win2K), type netscape.exe -profile_manager (as pictured below with a hyphen and an underscore) then hit the OK button. <next>
The profile manager will show every existing profile. Each profile will have its own unique edit -> preference settings so you will need to setup e-mail and proxy filtering for each of them. <next: new button>
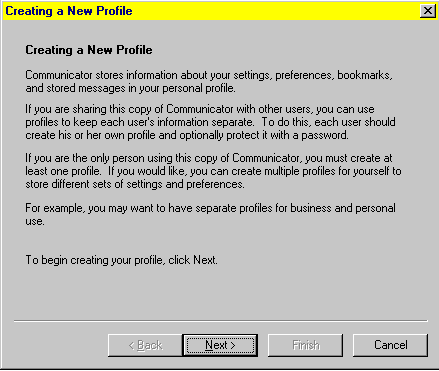
When you click the "new" profile button, you get a setup wizard. The various screen shots run in order below.
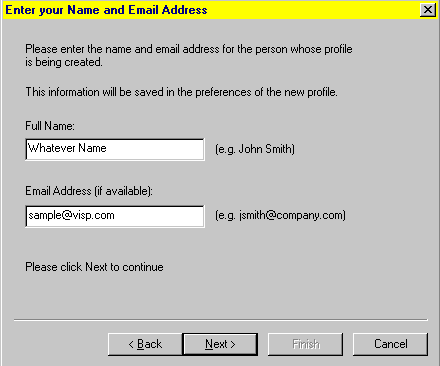
Click "next" on the first screen to get to the following one. Put the name that people will see as the sender's identity in the first box. This name does not have to match the e-mail username. You also need to put in the e-mail address. Make sure that you don't put any spaces in there or spell out "at" instead of using the "@" symbol. Click next.
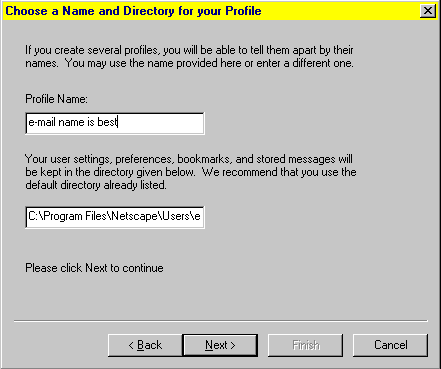
It is best to name the profile after the e-mail username. This can avoid some confusion. Leave the second box "as is" unless you are a computer expert with a specific need to put the profile in an unusual location. Click next.
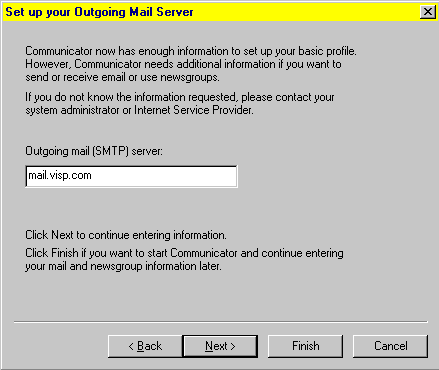
Set the outgoing mail server address then hit the "next" button. The outgoing mail server usually follows the format of mail.ispname.com.
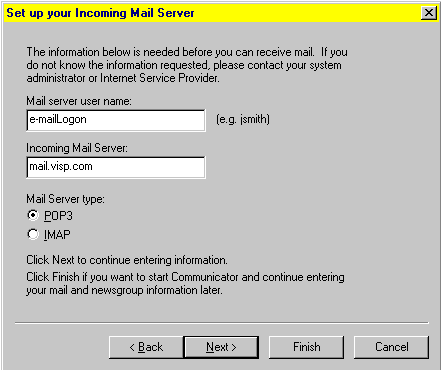
The e-mail server user name is almost always the same as the first part of the e-mail address (although it can be different if needed). Set the incoming mail server address then click next. The incoming mail server usually follows the format of mail.ispname.com.
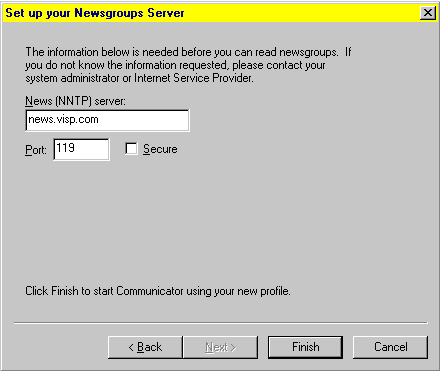
Enter the news server address. Leave it set for port 119 and do NOT checkmark the "secure" box. The news server address usually follows the format of news.ispname.com. Click next.
Click "finish" and the profile manager is ready. Click the drop-down list to choose a profile for configuration OR click the "manage profiles" button to create more profiles.
<next: netscape messenger> <news settings> <java & cookies> <return to top>
Netscape Messenger: You need to open Netscape Messenger so that you can send and receive e-mail. There is a little e-mail icon at the bottom of their Netscape window that you can click. It is pictured below. You can also click the "communicator" menu and choose "messenger" to open that component of Netscape.
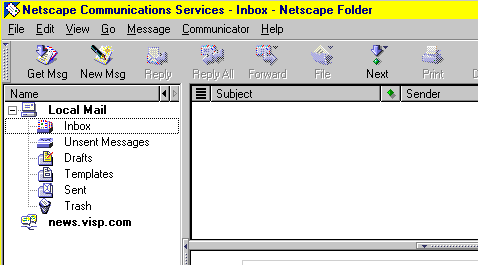
The messenger window is partially pictured below. Have the customer click "get msg" or "new msg" as needed.
<next: news settings> <java & cookies> <return to top>
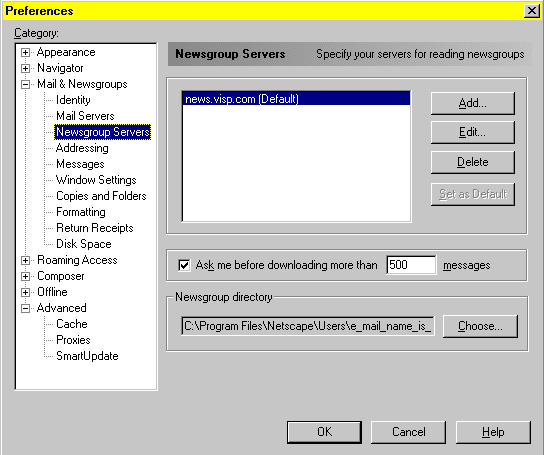
News Server Configuration: You can configure the news server options of Netscape by opening Edit menu -> Preferences. Click the plus sign + to the left of mail & newsgroups then highlight "newsgroup servers" as shown below. Click the add, delete or edit buttons as needed. The "add" and "edit" buttons will result in the screen following the one below.
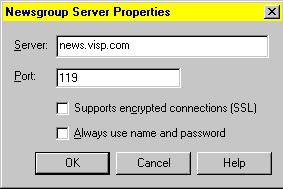
When you "add" or "edit" a news server account, you get the following window. Put in the news server address and leave it set for port 119. The news server address usually follows the format of news.ispname.com. NEVER put a checkmark in the support SSL encryption option. Don't worry about passwords. We don't password protect our newsgroups except that child pornography sites will generate a password error that can't be circumvented with any password.
<next: java & cookies> <return to top>
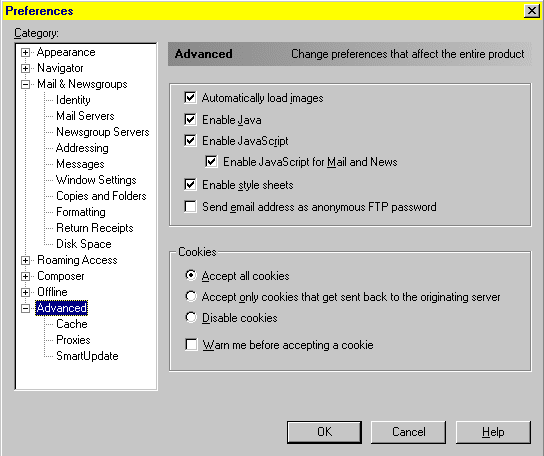
Cookies & Java: Some websites require the use of "cookies" or Java. You can enable these capabilities by highlighting the "advanced" category in the preferences section of the edit menu. Please note that our ISP (including these help pages) uses cookies extensively so please don't disable cookies if you are ever going to use our main website or these help pages.
<return to top> <windows browsers page> <windows e-mail page> <windows home page>
|

