|
|

|
|
|
Win 9X DUN Client & Control Panel Configurations Quick Links: Checking An Existing DUN Connection | Control Panel: Network | Control Panel: Add/Remove Programs | Control Panel: Modems & Device Manager | Rebuilding Winsock |
Creating A New DUN Configuration : Open your "My Computer" icon
Click the "Make New Connection" icon if the setup wizard doesn't start automatically.
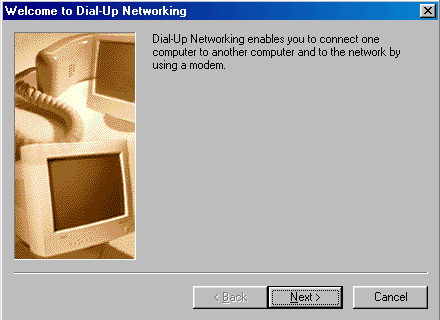
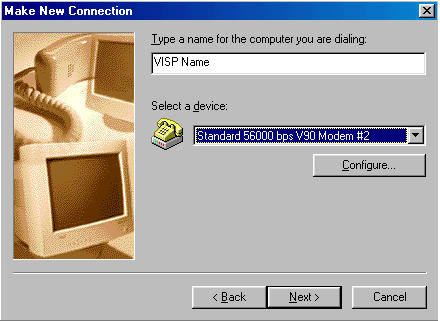
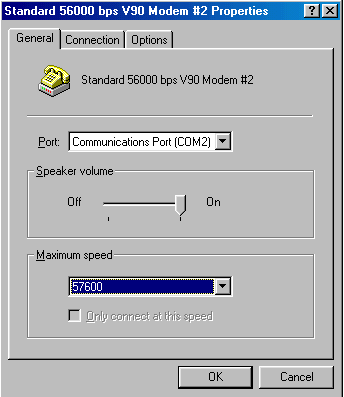
The first screen welcomes you and begins the setup process. Click Next. Name the DUN connection after your ISP. Select the modem from the drop-down list. Click the modem "configure" button to see the screen below.
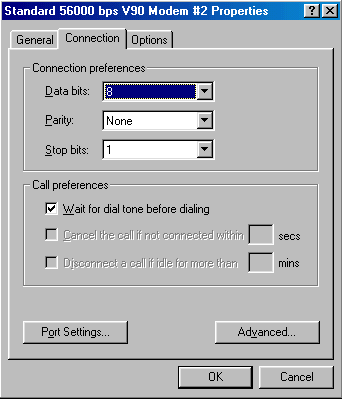
Set the speed to 57600. A 115000 connection will be highly unstable. Click the Connection tab to see the screen below:
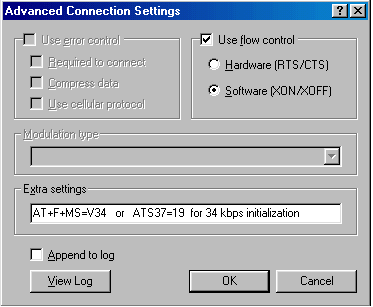
Leave the top boxes alone. If given an option, you do want a checkmark to wait for a dial tone before dialing. Don't set the "cancel call" option for under 30 seconds (if you have the option at all). Click the Advanced button to get the screen below:
This is where you set a "win" modem for software data flow. The most common Win modems: US Robotics 56k Win Modem; LT Win Modem; SupraMax 56k; HSP MicroModem; PCTel; Motorola SM56; ESS; Zoltrix; Shark; anything with HSP in the name. This is where you can set "init strings." The two strings shown in the "Extra Settings" box or options for configuring a 56k modem to connect at a 34k rate if it is unable to maintain a 56k connection. Click Here to return to the configuration section if this is NOT a NEW DUN creation. OR: Hit "OK" twice to get back to the DUN Wizard screen below:
Click Next:
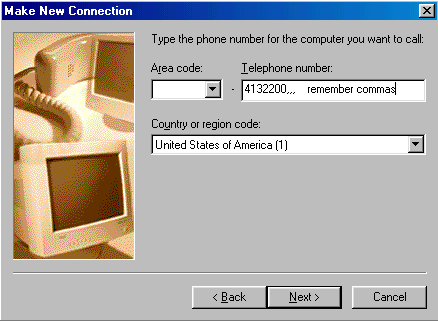
Leave the area code blank. Put in the phone number with 3 or 4 commas at the end of the number for a more stable connection. If you are at work or in a hotel then you may need to dial 9 to get an outside line. In that case, place a 9,, in front of the phone number. Be sure to put one or two commas after the 9 so that the modem will wait for the phone line transition before beginning to dial the number. You may also need a comma at the front of the number to force the modem to wait for a dialtone. For 10-digit dialing, put the area code in the phone number box (not the area code box).
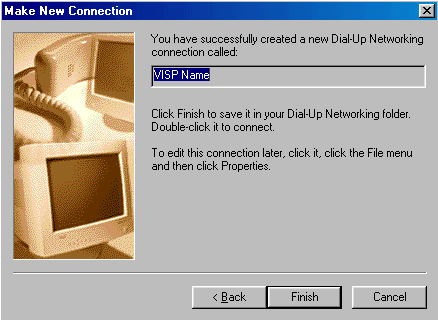
Click Finish. Continue to checking the properties of the DUN setup as described in the following section. <next>
Checking The Properties Of An Existing DUN Setup: Open the Dial-Up Networking
Folder:
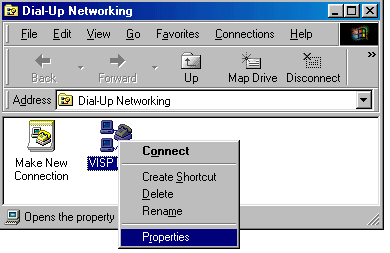
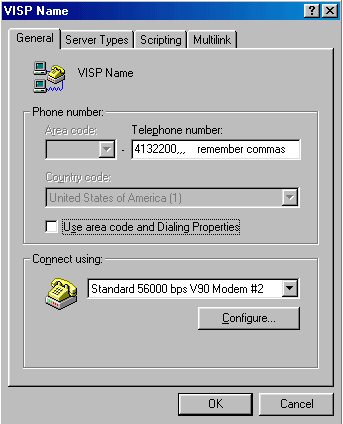
Right-click the dialer (known as a "DUN Client") and choose "Properties" to get the screen below. Note: You can also get to these properties by clicking to highlight the connection and then clicking File Menu -> Properties.
Leave the area code blank. Put in the phone number that is your connection to the Internet with 3 or 4 commas on the end for more stable connections. If you are at work or in a hotel then you may need to dial 9 to get an outside line. In that case, place a 9,, in front of the phone number. Be sure to put one or two commas after the 9 so that the phone line will transfer before the modem starts dialing. You may also need a comma at the front of the number to force the modem to wait for a dial tone. For 10-digit dialing, put the area code in the phone number box (not the area code box). Remove the checkmark in the "use area code and dialing properties" checkbox. For Modem Configure Options: CLICK HERE Click the Server Types tab to see the screen below:
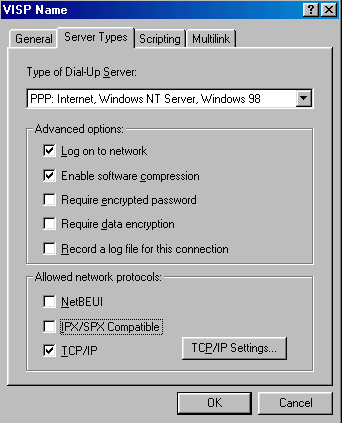
Always set "PPP....." as the type of dial-up server. You only need a checkmark for "logon to network" if you will be using FrontPage for website editing. You need a checkmark for "enable software compression" for faster connections. Do NOT put a checkmark in the "require encrypted password," "data encryption" or "record log file" options. This will prevent you from connecting to us. You do NOT want a checkmark for NetBEUI or IPX/SPX because this will slow down your connection with us. This does not disable Netware connections at work, etc. These DUN settings only relate to their internet connection with us. You can have other dialer configurations for other ISP connections to work or whatever. Click the TCP/IP Settings button to get the screen below:
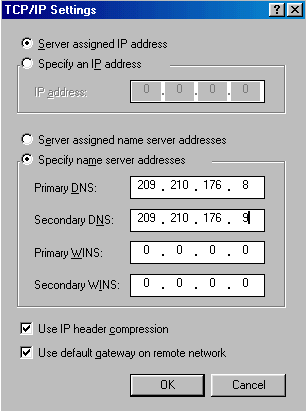
Only "specify" an IP address if you have paid extra for a static IP with us (which is unlikely). Most people will need to stick with the server assigned IP address scheme. Set the DNS numbers: 209.210.176.8 and 209.210.176.9 Leave the WINS numbers as zeros. You do need checkmarks for "use IP header compression" and "use default gateway." Hit "OK" all the way back to the main Dial-Up Networking window shown below.
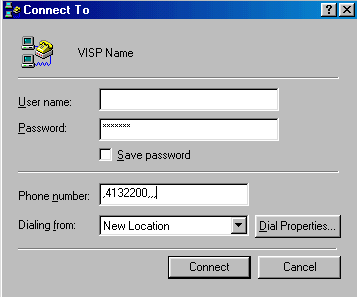
Double-click the DUN icon to open the "connect to" window below:
This window shows you exactly how the number will be dialed. You have to go into the properties of the DUN to change the number permanently. You can do a temporary change from here but it will revert to the old setting next time that you try to connect. Make sure that you have @ispname.com on the end of the username. Otherwise, you might get lost on an internet hub somewhere. In such cases, you will get a "server not responding error" because you won't be reaching your ISP's server. Once connected, you will need to open your Web browser such as IE5 or Netscape. You can now put in a website address such as www.google.com to start surfing the Internet. If you have problems surfing or connecting then look for conflicts in the Network Section of Control Panel (below). If everything appears to be correct then you may need to reinstall the DUN and Network components (further below). You might also need to reinstall the modem or update a modem driver in the Device Manager (furthest below).
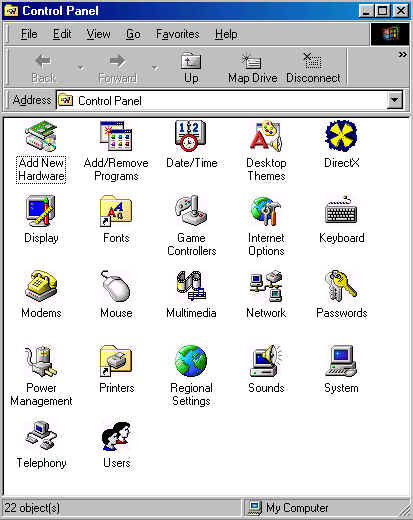
Configuring & Checking the Network Section of Control Panel Always check the Network section of the Control Panel when configuring or troubleshooting a dial-up network (DUN) connection. You need to make sure that a dial-up adapter is installed with TCP/IP protocols. You also want to make sure that there are no conflicting settings in there. Even though you've already setup the DUN properties with the DNS numbers, etc., there may be conflicting settings in the Control Panel from a work connection or prior ISP. Open the Control Panel (Start -> Settings -> Control Panel) (Alternate Route: My Computer -> Control Panel) and click the Network icon.
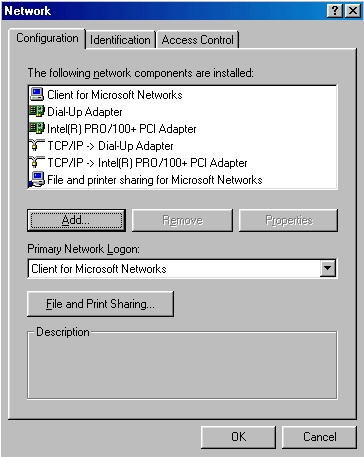
This window (below) will show you all networking components installed on that workstation. Don't worry about ethernet cards, etc. Your internet connection will need Dial-Up Adapter and TCP/IP -> Dial-Up Adapter installed. TCP/IP bound to a network adapter card (e.g. TCP/IP -> Intel Pro/100+ PCI Adapter in picture below) is totally irrelevant to your modem connection to the internet. Frontpage users will also need Client For Microsoft Networks. You don't need that client unless you are using Frontpage. If that client gets installed then it will add the Network Neighborhood icon to your desktop. Click the "add" button if you need to add a component. You will choose "adapter" to install the dial-up adapter or "protocol" to install TCP/IP [or "client" to install Client For Microsoft Networks). You will then get a prompt with two boxes. Scroll down the box on the left to highlight "Microsoft" then double-click the appropriate component in the right box.
Once the proper components are installed, double-click on TCP/IP->Dial-Up Adapter to configure the DNS settings, etc. Windows 98 users will get the warning window shown below. Windows 95 will go directly to the same configuration windows that Win98 users get after hitting "OK" in the warning window.
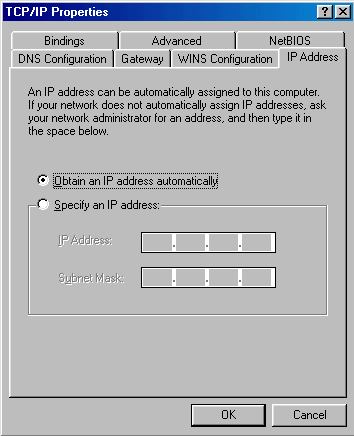
You will see the window below. It will always open under the IP Address tab. It is best to leave this window set to "obtain an IP address automatically." Even if you have paid for a static IP address, it is best to set that address in the DUN properties rather than in the Network section of the Control Panel. Otherwise, that IP address could conflict with other DUN connections to work or other ISPs in the event that you have more than one internet connection.
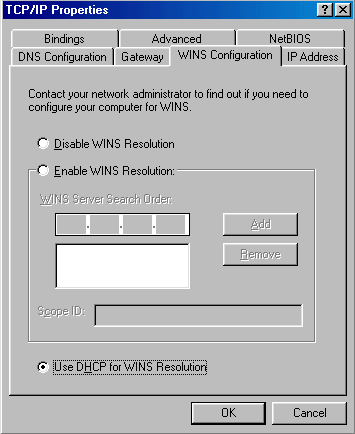
Click the "WINS Configuration" tab to make sure that WINS resolution is NOT ENABLED. Disable it if it is enabled. Don't worry if it is set to use DHCP because that won't affect a connection with us.
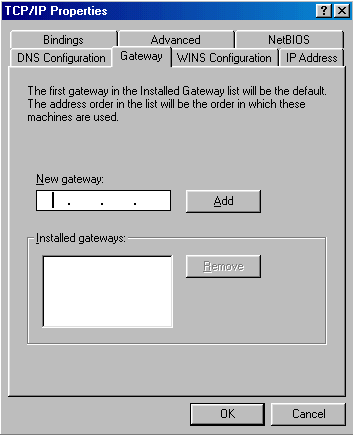
Click the "Gateway" tab to make sure that there are no gateways enabled. Remove the gateway if it is installed because that will interfere with their connection to us. Note: Some DSL customers will have gateways assigned. That gateway setting is not configured in TCP/IP -> Dial-Up Adapter so don't worry about that. DSL configurations are completely different from DUN configurations.
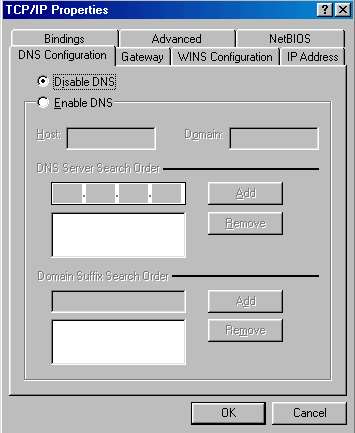
Click the "DNS Configuration" tab. Make sure that you are not using somebody else's DNS settings because that will disable any Web surfing through our connection. You could place our DNS numbers in there but it is best to do that through the DUN properties. If you do enable DNS through the Network section of Control Panel then set the host as your username. Don't worry about domain suffix search orders.
Hit "OK" and Windows will prompt you to restart the computer if any changes were made. If you are still having problems surfing or connecting then try reinstalling DUN and the Network components. You remove dial-up adapter and TCP/IP in Control Panel -> Network. You go to the Add/Remove programs section of Control Panel to reinstall Dial-Up Networking. This latter procedure is addressed in the section below.
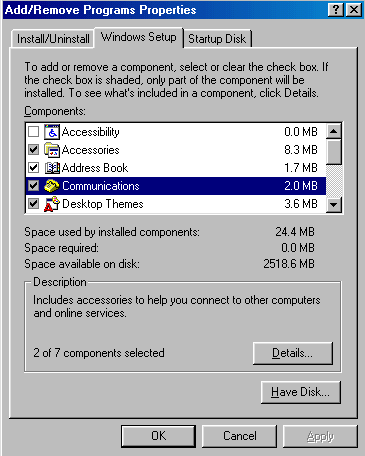
Control Panel: Add/Remove DUN & Network Components Make sure that Proxy Watch/Global Safe are disabled (if you are using them) before removing the Dial-Up Networking (DUN) components as described below. Open the Control Panel (Start -> Settings -> Control Panel) and double-click on the Add/Remove Programs icon pictured below.
Click on the "Windows Setup" tab to get the screen shown below.
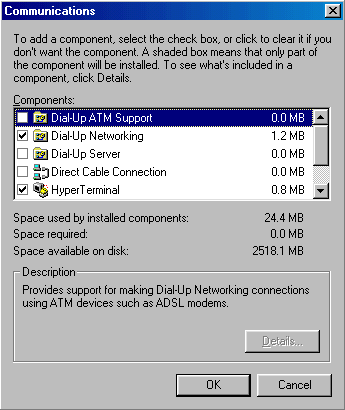
Double-click the "communications" option to get to the window below:
Remove the checkmark for Dial-Up Networking. Hit "OK" and "Apply" the change. Windows will ask you to restart the computer. Do NOT restart yet! Go to to the Network section of Control Panel and remove the dial-up adapter and TCP/IP first. This avoids having to restart the computer twice. After you've restarted the computer, go back into the Windows Setup tab of Add/Remove Programs (as described above) and reinstall DUN. [Note: You would also need Hyperterminal if you are using DSL.] Once again, do NOT restart the computer after this process is finished. Go to the Network section of Control Panel to make sure that the dial-up adapter and TCP/IP are installed. Afterwards, you will not need to recheck the TCP/IP settings because newly installed TCP/IP protocol stacks are very neutral. They won't have conflicting settings from other ISPs, etc. Restart the computer after the dial-up adapter and TCP/IP are reinstalled. You will have fresh networking components and should be able to connect if (1) the modem is working and (2) it's not a port problem on any of the many hubs that traverse the internet.
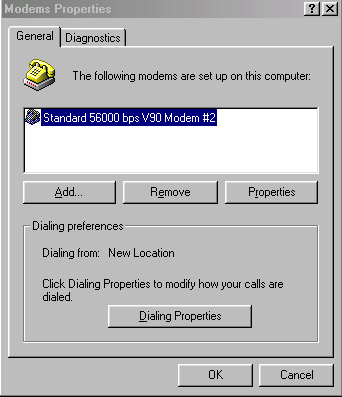
Control Panel: Modems Section & Device Manager You generally want to do your modem configuration in the DUN properties. You would go to the modem section of the control panel to reinstall a modem and/or remove "ghost" modems that aren't actually installed even though the computer thinks that they are installed.
Don't bother configuring the modem's properties in the screen below. The DUN properties will override these settings. Just add or remove modems as needed.
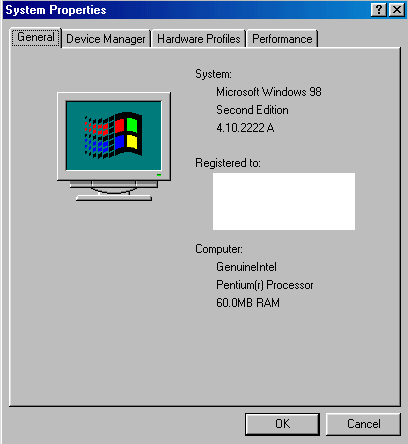
You can use the Device Manager to add/remove modems and/or update a modem driver. Click on the System icon in Control Panel to get to the Device Manager.
The basic system window is shown below. Click on the Device Manager tab.
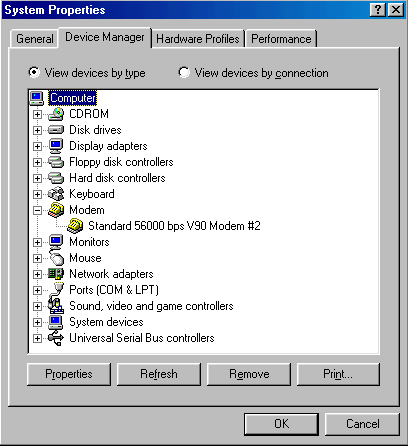
Once inside the Device Manager tab, click the plus + sign to the left of the modem selection. Double-click that modem to get to its properties.
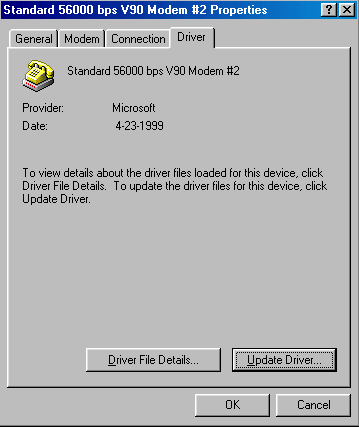
Once inside the properties of the modem, click the Driver tab to get to the screen below.
Most new modem drivers are "self extracting" and will automatically install themselves. If not, you can click the Update Driver button to force a modem driver update. <return to top> <windows home page>
|
