|
|

|
|
|
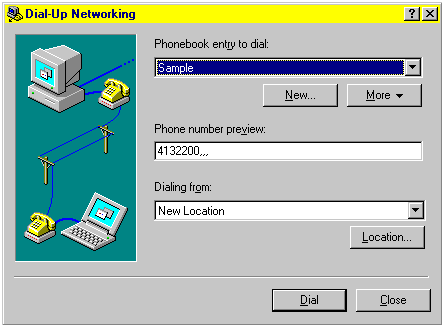
NT4 DUN Configuration Open the Hard Disk -> Double-Click Dial-Up
Networking Icon:
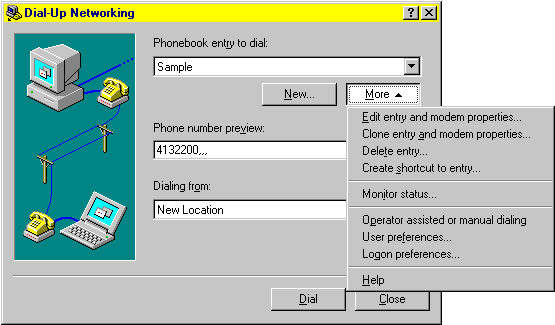
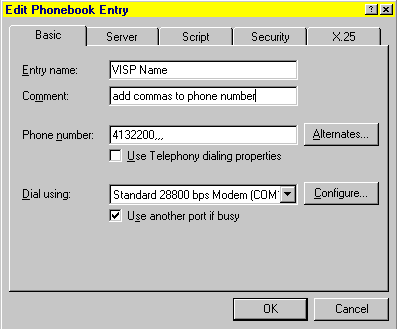
You can click the "New" button to create a new DUN connection. Choose "I already know about DUN connections" and the Finish button to get to the Edit Phone Entries window (second below). Click the "More" button drop-down arrow for the following options:
You can delete old DUN profiles from this drop-down list. You are more likely to choose the "Edit Entry & Modem Properties" option. This will give you the following options:
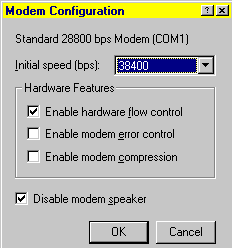
Set the "Entry Name" with the name of your internet service provider. Set the phone number. It is a good idea to add 3 or 4 commas to the end of the phone number. Don't use telephony dialing properties. Set 10 digit dialing or "call waiting" (*70,) directly into the box. Warning: If you have a second phone line that doesn't have "call waiting" then *70 will cause you to get busy signals. Select the modem in the "Dial Using" drop-down list. Click the "configure" button to see the following window:
Set the correct speed for your modem. Note: If you set the speed too high for your modem then it will be a highly unstable connection. Error control and modem compression are good features but they aren't options without hardware flow control. Remove the hardware flow control checkmark if the client has a "win" modem such as the US Robotics 56k Win modem, LT Win Modem, HSP Micromodem (or any other HSP modem), PCTel 56k modem, SupraMax 56k modem, Zoltrix 56k modem, Motorola SM56 modem, ESS modem and Shark 56k modem. These modems cannot use hardware data flow. Every other modem will want to use hardware flow control with error control and compression enabled. Disabling the modem speaker isn't helpful when troubleshooting connection problems. It is useful to be able to hear if the port is squealing, reporting busy signals, etc. Hit the "OK" button to return to the prior screen. Click the Server tab to see the following window:
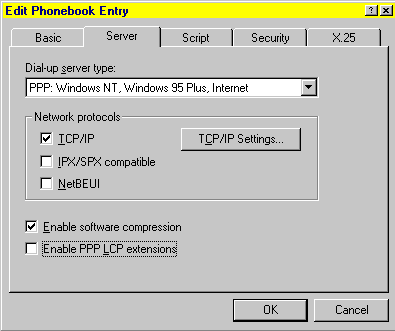
You must use PPP as the dial-up server type. You ONLY need TCP/IP for an internet connection. IPX/SPX and NetBEUI may be relevant to OTHER phonebook entries but they will only slow down your internet connection with us. Enabling software compression will speed up connections. Some people report that they get better connections with PPP LCP extensions enabled. Other people find that they can't maintain a stable connection with those extensions. Try disabling them if you are having problems with your internet connection. Click on the TCP/IP Settings button to get this window:
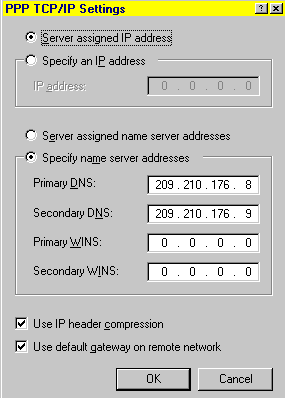
Most people have a dynamically assigned IP address so choose "Server Assigned IP Address." Specify the IP address ONLY IF you have paid extra for a static IP address assigned to you by us. Set the DNS numbers: 209.210.176.8 and 209.210.176.9. We do want checkmarks for both IP Header Compression and Default Gateway. Hit "OK" to return to the main setup window then choose the Security tab for the following screen:
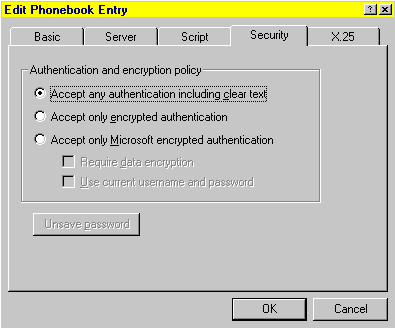
Choose "Accept any authentication including clear text" then hit the "OK" button. You don't need to bother with the other tabs: Script & X.25. Click the "OK" button and you are almost finished.
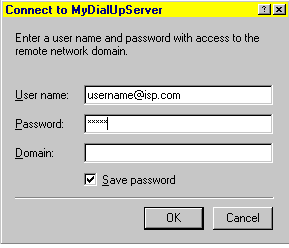
Click the "Dial" button to get the following screen:
Be sure to leave the domain box blank!!! Be sure to put @ispname.com on the end of the username so that you will be more likely to reach your ISP. The Internet is full of hubs and ports that are used by a bunch of different ISPs. Specifying your ISP in this manner will make sure that you route to your ISP instead of getting lost somewhere. |
