|
|

|
|
|
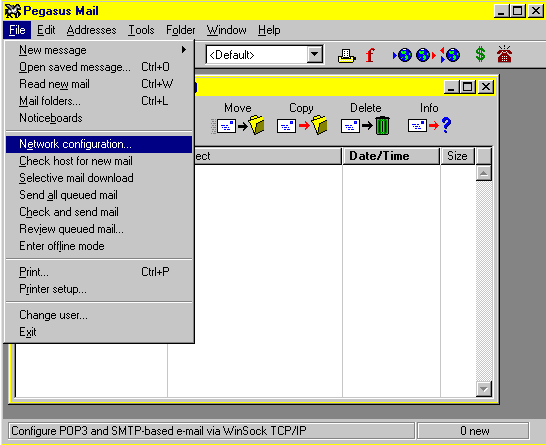
Pegasus Version 3.12c is the earliest version of Pegasus that supports SMTP mail authentication so you will need to use that version or an even newer one. You can download free program upgrades at www.pmail.com. Pegasus has a setup wizard that may try to walk you through the setup. We recommend avoiding that wizard because it won't setup everything that you need. If needed, just plug-in any info to satisfy the wizard and then go into the program and reset it according to the following instructions. Begin by opening Pegasus. (You don't need to be connected to the Internet but it wouldn't hurt.) Click the File menu in the top left corner and choose "Network configuration" as pictured below.
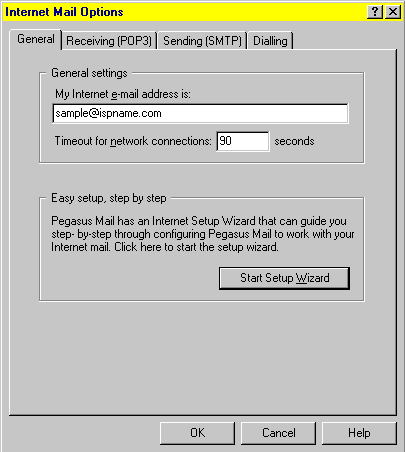
You will start in the "General" tab as shown below. Plug-in your e-mail address in the first box then click the second tab at the top where it says "Receiving (POP3)" to get to the next window. (Hint: Your network connection timeout should be anywhere from 90 to 180 seconds.)
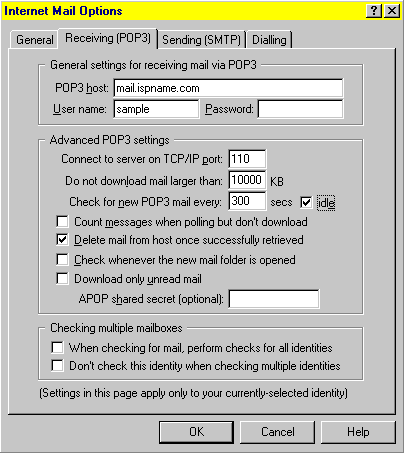
Your "POP3 host" box should have your ISP's incoming mail server address. In most cases, it will be something like mail.ispname.com but some ISPs use a format similar to pop3.ispname.com. If you don't know the correct mail server address then try mail.ispname.com (or .net if applicable) or simply call your internet's tech support number. The "User name" will be the first part of your e-mail address. For example, if your account is santa@northpole.com then your username would be santa. The password is the password for that particular e-mail account. Match your settings to the configuration shown below then click the "Sending (SMTP)" tab. The "Checking multiple mailboxes" settings are optional.
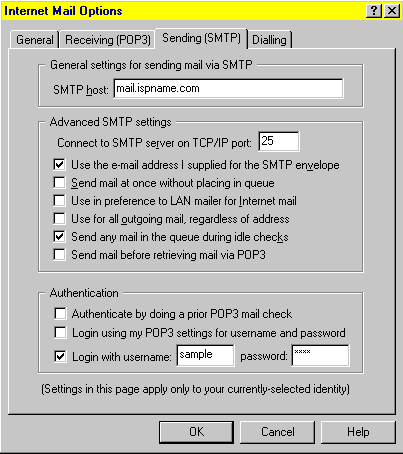
The "SMTP host" box should have your ISP's outgoing mail server address. It will usually be something like mail.ispname.com (or .net if applicable) but some ISP's use the smtp.ispname.com variation. Once again, call your ISP's tech support department if you don't know the correct mail server address. The TCP/IP port must be 25. Most of the other settings are optional EXCEPT the "Authentication" settings. Choose the third authentication option with a checkmark (just click on the box) and put in your "Login with username" information. For example, santa@northpole.com would login with santa and the password for that particular e-mail account.
Click OK. You can now connect to the internet to send and receive e-mail. (Don't forget that you actually have to connect to the internet before you can send or receive e-mail.) |
 Pegasus Version 3.12c
E-Mail Setup Instructions


