|
|

|
|
|
Related Pages: Mail Account Setup Wizard | Identities | News Servers | OE Won't Save Password | Links on this Page: Tools->Accounts: Setup & Configure E-Mails | Tools-> Options | Tools->Accounts Links: E-Mail Accounts | General Tab | Servers Tab | Connection Tab | Advanced Tab | Tools -> Options Links: Tools Options | General Tab | Connection Tab | Security Tab |
Outlook Express 6 Overview: These configuration instructions apply to PC versions of Outlook Express 6 (OE6). Go to the Macintosh section for Outlook Express screen shots for that operating system. OE6 is probably the best mail client available for free at places like www.tucows.com and www.download.com. You can download it directly from www.microsfot.com/ie. It must be downloaded along with Internet Explorer 6, so it can take quite a while. OE6 has added some additional security features over OE5. For most users, if you have OE5.5, upgrading to OE6 may not be necessary. OE6 is a great program because you can easily setup multiple identities (profiles) for everybody in the family. Each identity can check a bunch of different e-mail addresses. You can also password protect each identity for privacy in the family. Each of these options are covered in this document.
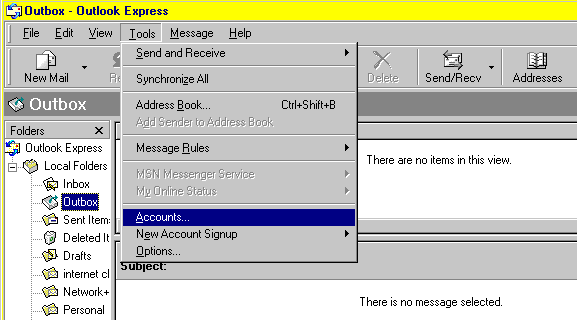
Tools Menu -> Accounts Button: Creating & Configuring E-Mail Accounts Quick Links: | E-Mail Accounts | General Tab | Servers Tab | Connection Tab | Advanced Tab | The basic OE6 window is pictured below. Please note that the following example is showing the outbox window. Click on the inbox window or whichever folder is desired from the drop-down box on the left.
Click the "tools" menu to access the address book, accounts and/or options section. We need to go to the accounts section to create or configure individual e-mail settings. <next>
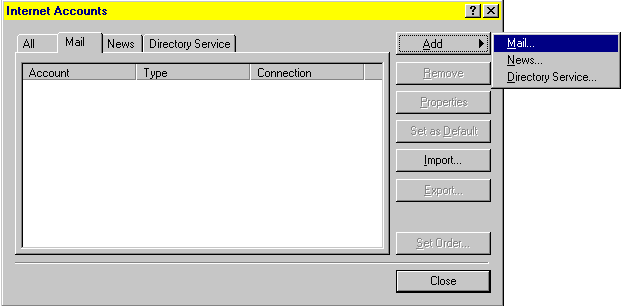
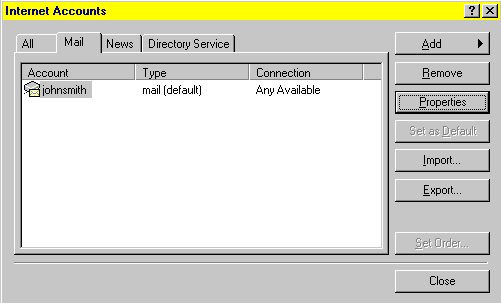
Once you are in the accounts section, click on the mail tab to see all existing e-mail settings. Be sure to delete obsolete internet accounts for old ISPs. They will generate errors if you run OE5 because the old ISPs will reject your attempt to check non-functioning e-mails. You can highlight any accounts listed in the box and then hit the remove button to clear them out. Hit the "properties" button to edit any accounts that are still functional. If you click the "add" button and choose the "mail" option then you will go into the OE5 setup wizard which is covered in another section. Click here to see those screen shots or continue below to configure an already created e-mail account. <next>
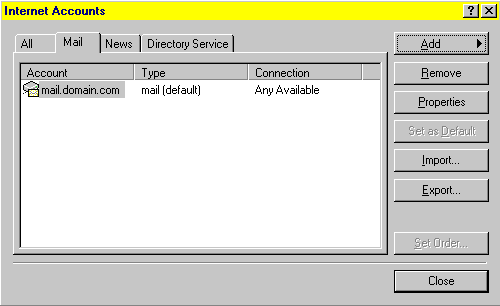
Newly created e-mail accounts will be identified by their mail server addresses. For example, if you setup three @ispname.com e-mail accounts in OE5, they will be identified as mail.ispname.com(1), mail.ispname.com(2) and mail.ispname.com(3). Needless to say, this isn't a very intuitive naming scheme. Open your properties for each account and rename the accounts with the appropriate e-mail username for easy identification later.
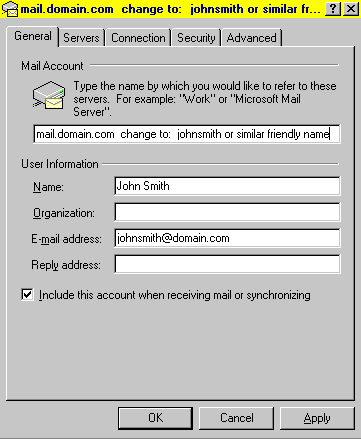
Properties: General Tab The properties section has five tabs. We will start in the general tab where you can rename accounts such as mail.ispname.com(1) into a more intuitive name such as the e-mail username. The top box is where that name gets set. Don't forget to hit the "apply" button to make this or any other change. The "user information" section is where you set or change the name that people see when you send them an e-mail from this account. It is also where you set the e-mail address. Leave the "reply address" blank unless you want to reply from a different e-mail account (which is unusual for our clients). Don't forget the checkmark to include this account when sending or receiving mail. You also need to hit the "apply" button to make changes effective.
Below: An example of the name having been changed in the top box of the preceding screen. The johnsmith account had originally been named mail.domain.com after its mail server address. Now it has a more easily recognizable name. This is helpful if there are several different e-mail identities using the same mail server address.
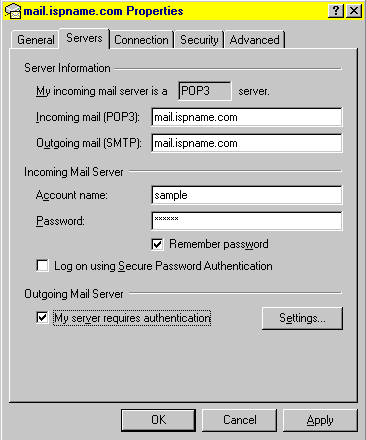
Properties: Servers Tab
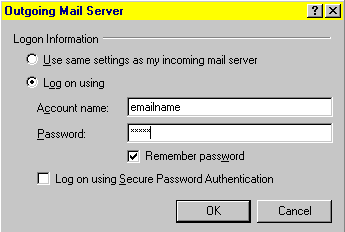
The servers tab is where you set the mail server addresses. This is the most prevalent cause of mail client connection problems so it is usually the first thing that you would need to check. The mail server address will usually follow this format: mail.ispname.com [or .net]. You can also use the mail server's IP address if you are having DNS problems. You also set the e-mail username and password. This e-mail username is often different than the dial-up username since families will use a single dial-up username and multiple different e-mail identities. Do NOT put a checkmark in the "log on using secure password authentication" box. This involves encryption that will only work on virtual domain mail servers that have paid extra for encryption that is specifically setup by for that account at an extra cost. You do want a checkmark in "My server requires authentication" so click in that box to add one if needed. Click the "Settings" button to get to the following window. Select the option to "Log on using" and put in your e-mail name and password. Do not choose "Log on using Secure Password Authentication." Click the OK button.
"Apply" changes and click on the connection tab when finished. <next: connection tab>
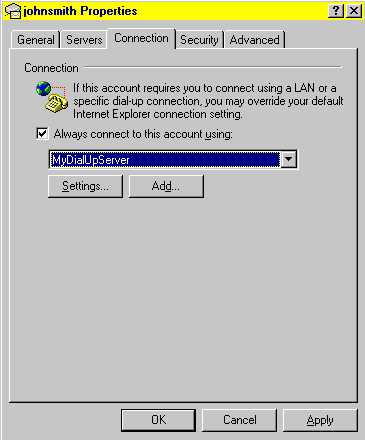
Properties: Connection Tab The connection tab is where you can setup OE6 to automatically connect to your ISP when opening OE6. Put a checkmark in the box. Click the drop-down arrow to choose your ISP DUN connection. That drop-down list will show every DUN connection that is setup in the dial-up networking section of your computer. You can also click the "settings" button to change the DUN settings or the "add" button to create a new dial-up networking account. Hit "apply" when finished and skip the "security" tab to go to the "advanced" tab for one last important tweak on the configuration. <next: advanced tab>
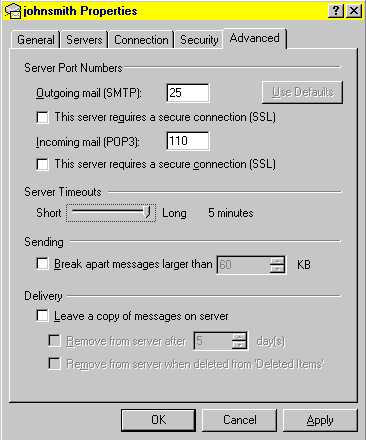
Properties: Advanced Tab The "advanced" tab is where you can maximize the server timeout setting for OE6. The default is 1 minute but you will want to "tweak" that all the way to its maximum of five minutes for improved performance handling larger volumes of e-mail and possibly larger attachments. We strongly discourage you from leaving a copy of messages on the server. OE6 will do this effectively for a while but it will eventually start reporting that there are "no new messages" even though there are new messages. The problem is caused by OE6 seeing old messages at the top of the list and assuming that the rest of the messages are also old. Make sure that you do NOT put a checkmark for the SSL secure connection options unless you are running a virtual domain that is specifically setup with a secure SSL mail server. [This is highly unusual with standard internet connections.] Hit "apply" and then "ok" to finish the configuration. You are ready to check your e-mail unless you need to setup additional e-mail identities. In the latter case, repeat the steps covered in this section for each e-mail account. Remember: It is often preferable to use the Identity Manager to setup an identity for each member of the household. Each identity can have numerous e-mail accounts. Individual identities can be password protected so that family members can have their privacy. Using a single identity for multiple family members will result in everyone's e-mail showing up when one of the family checks his e-mail.
Tools -> Options Configuration Quick Links: General tab | Connection tab | Security tab | The Tools -> Options window is where you can set a variety of options. Click the "tools" menu and then click the "Options" at the bottom of the drop-down menu to access the options section. Browse around and set things as you like them. The only options that we are concerned about are shown below.
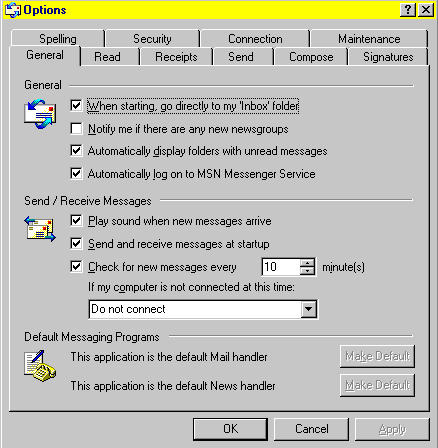
The General tab is where you set OE6 to go directly to its inbox when started. Most people want this but it isn't required. You can also set OE6 to play a sound when new messages are received. You can automate OE6 to connect to the internet through any ISP by clicking the drop-down list (where it says "do not connect" in the example below). Most people will want that set to connect automatically. You probably don't want to check for new messages more often than once every ten minutes. More frequent e-mail checks will put a lot of overhead on your computer and slow down your connection and programs. Hit "apply" if needed then check the connection tab. <next>
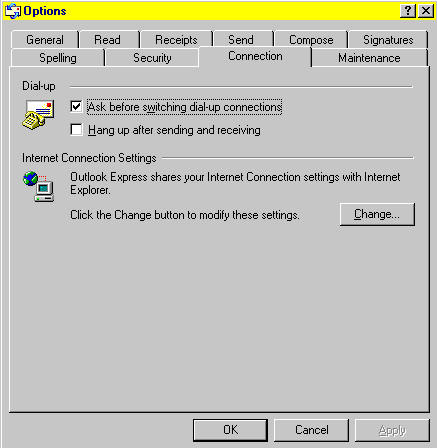
The Connection tab has one potential problem spot. Sometimes, customers will complain that we disconnect them every time they send or receive mail. We don't disconnect anybody for a minimum of six hours. The checkbox for "hang up after sending and receiving" is the culprit so don't put a checkmark in that box. <next>
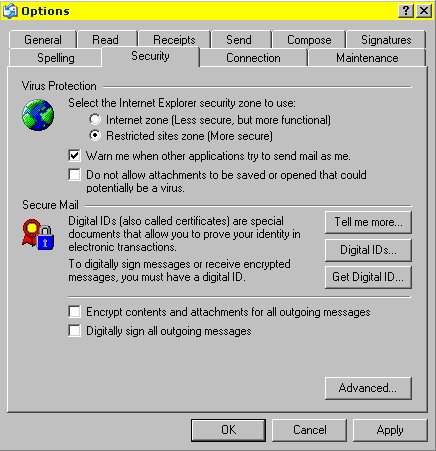
The Security tab has some new security settings which may cause problems when people try to open attachments. It also has a feature that might help to prevent the spread of viruses. The option that says "Do no allow attachments to be saved or opened that could potentially be a virus" might prevent the opening of attachments (especially executables) so keep this in mind if you are having problems opening mail attachments in OE6. While you're in that screen, the "Warn me when other applications try to send mail as me" is a good precaution to take. The feature is geared towards counteracting KLEZ type viruses.
That is everything you need to know about configuring OE6. If you still cannot check your e-mail then try using Internet Explorer or Netscape to access the Web interface to your e-mail. <return to top> <return to windows home page>
Last Update: Thursday, July 03, 2003
|