|
|

|
|
|
Configuring Windows 2000 Pro Dial-Up Networking Quick Links: | Intro | New Setup Wizard | Configuring Existing ISP Connections | Modem Settings | Network Settings | TCP/IP Settings | Installing Network Components | LAN Sharing | Pinging In Win2k | Modem Control Panel | Summary: Windows 2000 (Win2k) combines its DUN settings and network settings into one big component. It is fairly easy to configure but it is quite different from Windows NT and Windows 9X. The good news is that Internet Explorer, Outlook Express and Netscape configurations are unchanged. This tutorial includes all of the necessary screen shots (and a few optional screen shots) so that you can configure Win2k to connect to the internet through a modem.
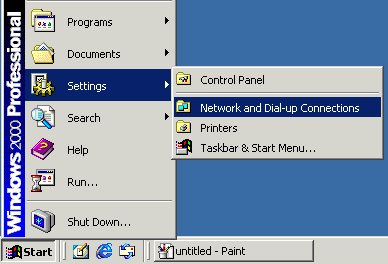
Intro: Getting to the Network & Dial-Up Connection Settings Windows 2000 combines the old network section of the Win9X control panel with the DUN settings. You can access them in one of three ways. (1) You can click Start -> Settings -> Network & Dial-Up Connections as pictured below. <next>
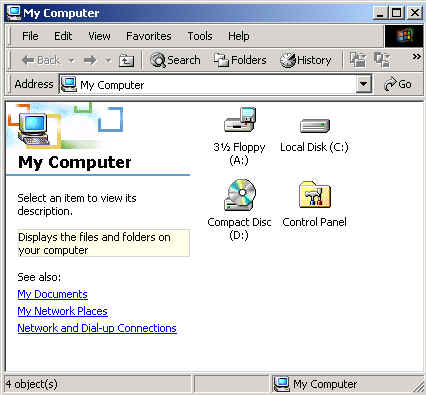
(2) You can also open My Computer and click on the "Network and Dial-Up Connections" link as pictured below. <next>
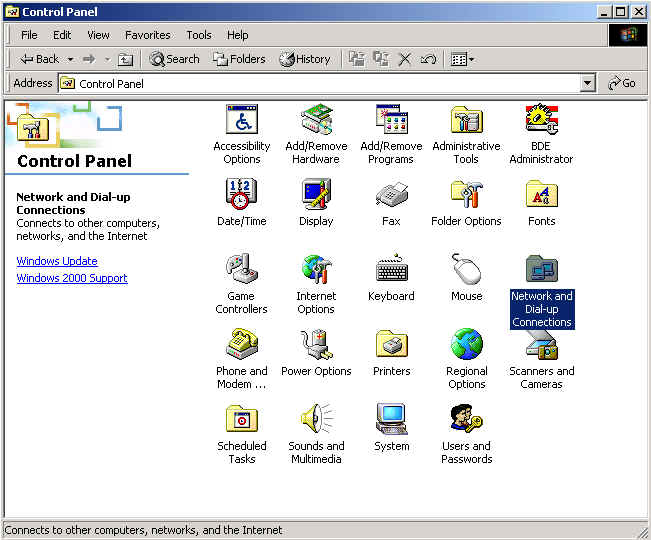
The third option is to open the control panel where you can open the folder "network and dial-up connections" to get to the DUN settings. <next>
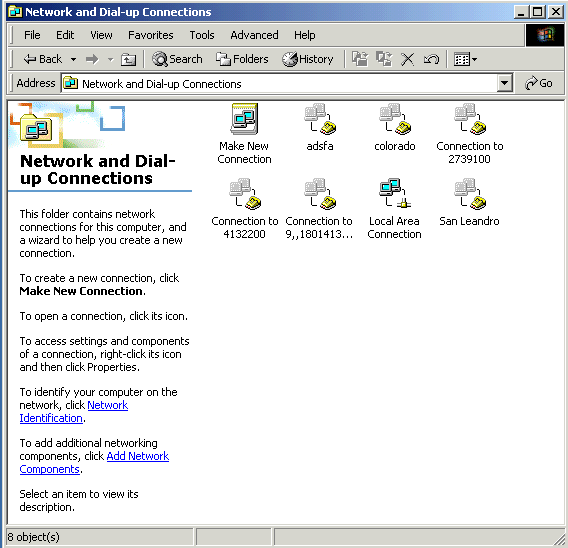
The network and dial-up configurations window is pictured below. You have several options from this window. You can click the "add network components" hyperlink to install a protocol, dial-up adapter and/or client such as Client For Microsoft Networks. You can view the "connect to" window by double-clicking an existing connection. You can check an existing connection's properties or you can click the "make new connection" icon to use the new connection wizard. All of these options are covered in this tutorial. Links: | Next: New Connection Wizard | Configuring Existing Connections | Installing Components |
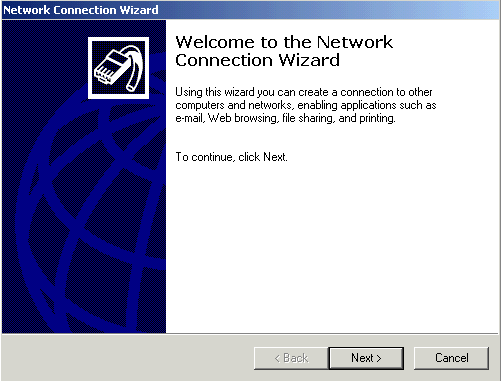
New Setups: Connection Wizard The "network connection wizard" helps you to configure a new DUN connection plus it also sets up the e-mail and news settings for a new connection. Click "make new connection" in the connection and dial-up networking window to get to the window shown below. Click "next" to begin the process.
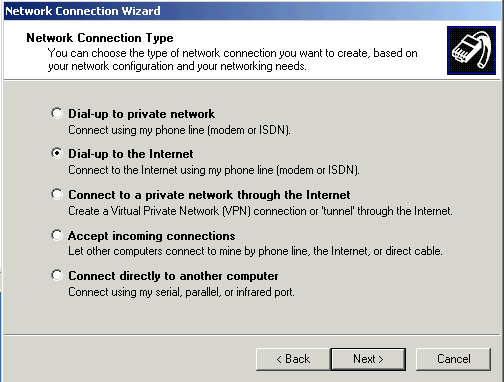
The first thing that you will do is choose to "dial-up to the internet" in the window below. Click next.
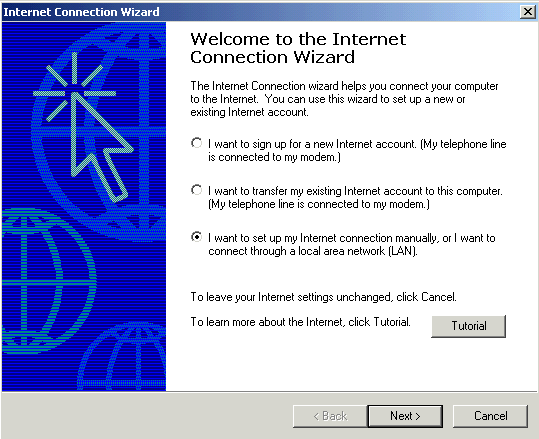
Choose the third option: "I want to set up my Internet connection manually . . . " then click next.
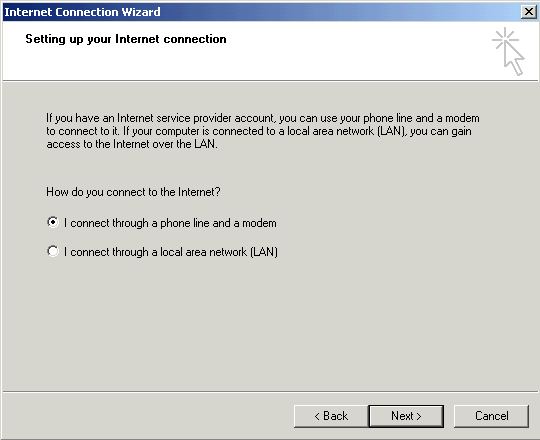
Select "I connect through a phone line and a modem" then click next.
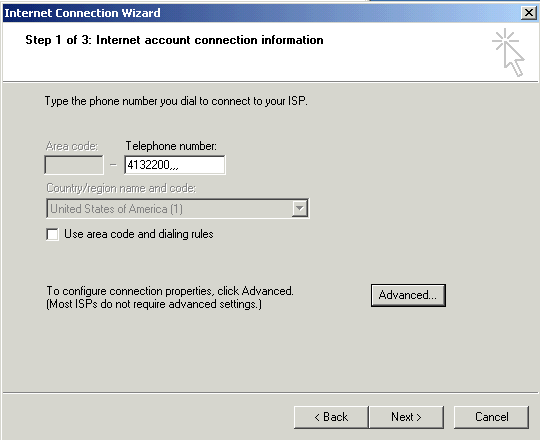
Type in the phone number with three or four commas on the end of it. If you need to do "10-digit dialing" then put the full 10-digit number into the telephone number box. Try to avoid using the dialing rules because you are less likely to have problems if you force the correct dialing through the phone number box. For example, add "*70," to disable call waiting. Add "9," if you need to dial a 9 to get an outside line. Notice how there is a comma after the "*70" and "9" in the examples. The comma causes the modem to pause during the phone line transition. Otherwise, it may try to dial too quickly and cause a busy signal. Click the advanced button. <next>
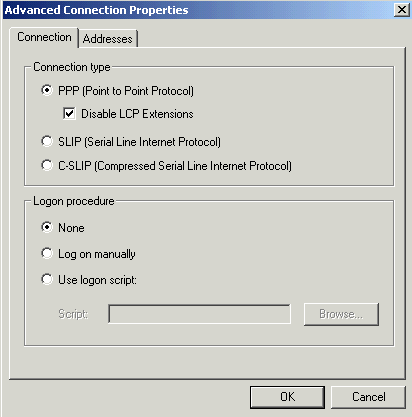
The advanced button is shown below. You should be set for a "PPP" connection. The LCP extensions often improve connections but sometimes they cause problems. If you are having trouble connecting then you might need to disable the LCP Extensions. Choose "none" for the logon procedure. Click the addresses tab at the top of the properties window. <next>
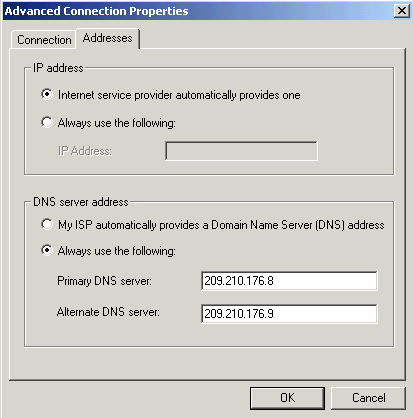
Internet service providers automatically provide a new IP Address each time a client connects to them. In some cases, customers may pay extra for a "static IP address" in which case you would plug that in by selecting "always use the following IP Address." Set the DNS numbers to 209.210.176.8 and 209.210.176.9 as shown in the window below. Hit "OK" to return to the connection wizard. <next>
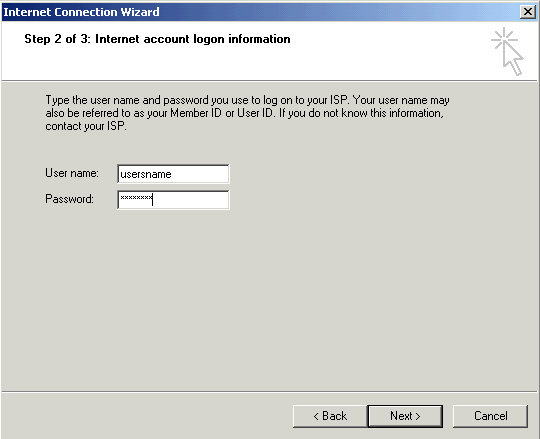
Plug-in the username and password. Remember that they are cASe sENSitive. Click next.
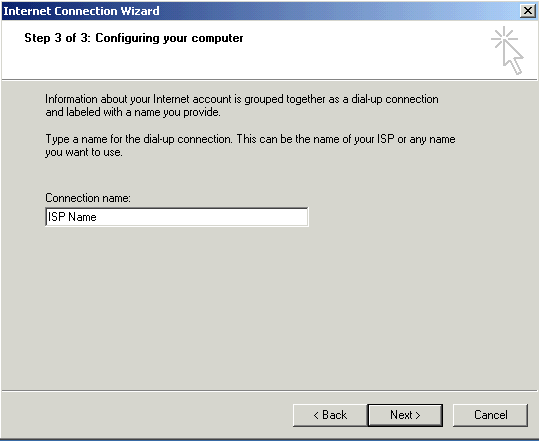
Name the connection after the internet service provider. Click next.
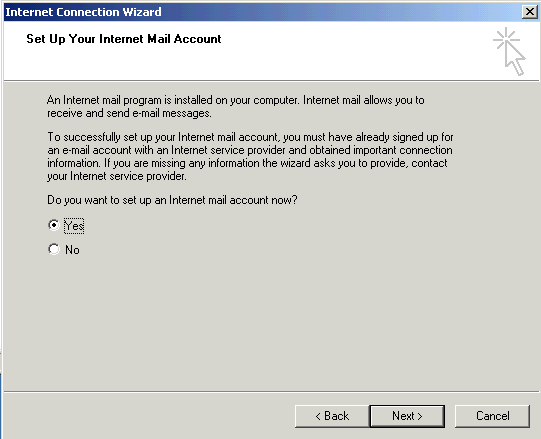
Choose "yes" to setup the e-mail account (unless you won't be doing any e-mail). You can also select "no" and setup the e-mail client later. Click next.
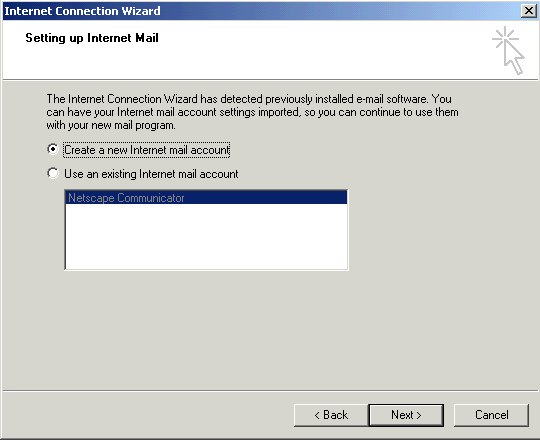
The following screens show you how to configure the e-mail. You can "import" the settings of an existing e-mail account in Netscape, Outlook Express, etc., if you are already setup for them and merely upgrading a Win9X box to Windows 2000. This tutorial assumes that you are setting up a new e-mail account. Click next.
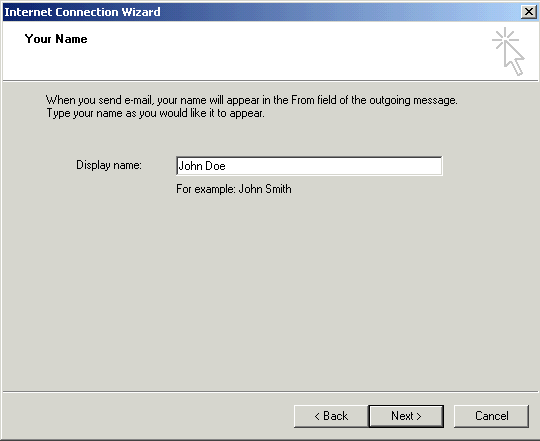
The display name is the name that people see when they receive an e-mail from you. It does not have to match your e-mail identity. Click next.
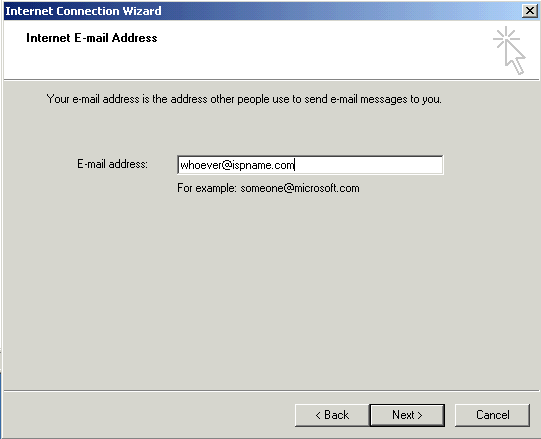
Plug-in the e-mail address. Don't spell out "at" for "@" and don't include any blank spaces in the address. Click next.
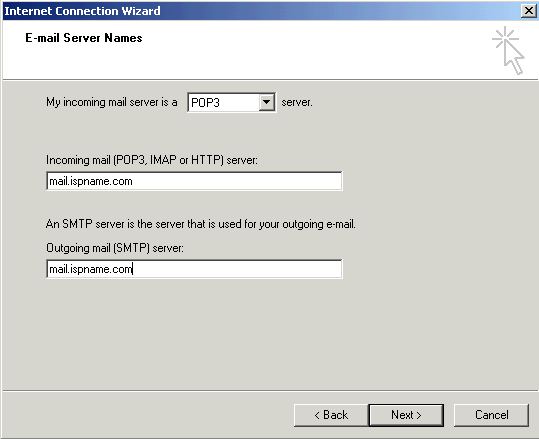
The incoming mail server will always be "POP3." Click next.
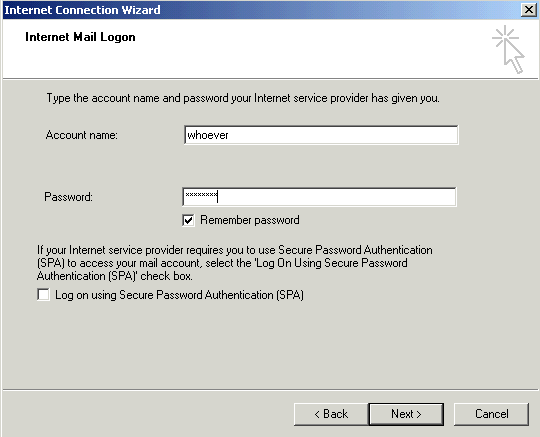
The account name is the e-mail logon. It is not necessarily the same as the general dial-up logon. It is usually the same as the e-mail address prior to @ispname.com. For example, sample@microsoft.com would probably logon as sample. The account name and password are cASe sENsiTive. It is convenient to have it remember the password unless you are very worried about privacy. Do NOT select logon using Secure Password Authentication. Click next.
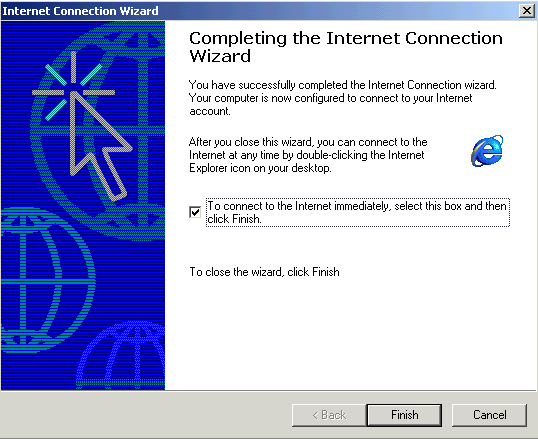
If you have a free phone line attached to the computer then put a checkmark in the box to connect to the internet after you hit the finish button. Click finish. | Next: Configuring Existing Accounts | Installing Network Components |
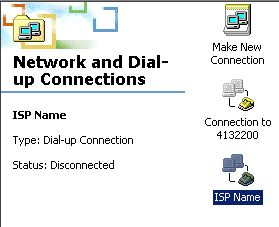
Configuring Existing Connections: Open the "network and dial-up connections" window by clicking Start -> Settings -> Network & Dial-Up Connections or by choosing the appropriate hyperlink in My Computer. This will bring up the window shown below. <next>
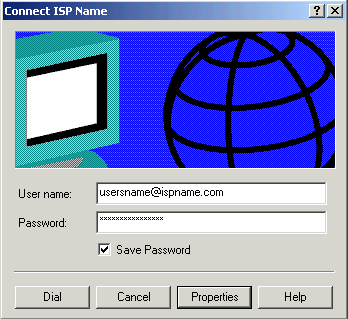
You can double-click open the connection window. From here, you can click "dial" to connect to the internet or you can click the "properties" button to configure the DUN connection. <next>
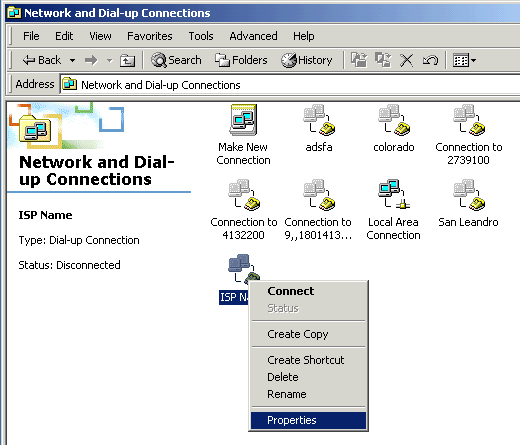
You can also right-click on the connection to choose properties as shown below. <next>
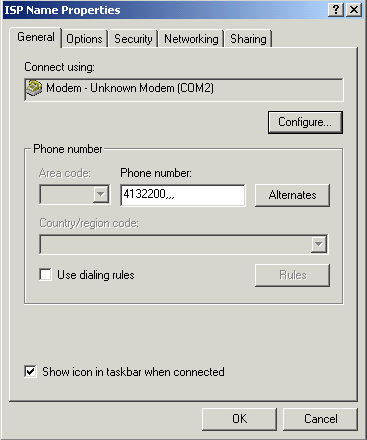
The DUN properties window has numerous tabs starting with the general tab pictured below. Set the phone number as it will need to be dialed. Here are some common variations: include the area code in the phone number box for 10-digit dialing; type "*70," to disable call waiting; type "9," to get an outside line as needed. Be sure to put 3+ commas on the end of the phone number for improved connections. If you are dialing *70 to disable "call waiting" or 9 to get an outside line then put a comma at the end like this: *70, or 9, so that the phone line will have time to transition prior to dialing. It is a good idea to put a checkmark in the
"show icon in taskbar" option. That icon looks like two little
computers as follows: <next: configure modem button> <alternate: skip modem to continue DUN configuration>
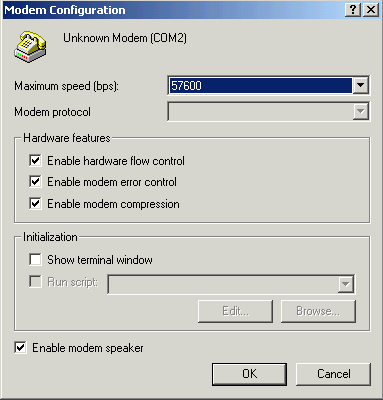
Modem Configuration: Open the DUN properties for the connection. Go to the general tab and click the configure button to setup the modem. Set the maximum speed to match the modem. For example, a 56k modem should be set to 57600. The modem will have an unstable connection if you set the speed too high. Put a checkmark in all of the hardware features if it is a hardware modem. If it is a "win modem" then remove the checkmarks so that hardware flow control is not selected. Error control and modem compression are helpful but not required. These are the most common "win" modems: US Robotics 56k Win Modem, LT Win, SupraMax 56k, HSP Micromodem, PC Tel, Motorola SM56, Zoltrix, Shark, ESS and anything with an HSP in the name. Note: Rockwell claims that the HCF modems are hardware flow modems but try software flow if that doesn't work. It is a good idea to have a checkmark in the box for the modem speaker. It helps to troubleshoot modem connection problems if you can hear the squeal, busy signal, etc. <next: resume DUN configuration>
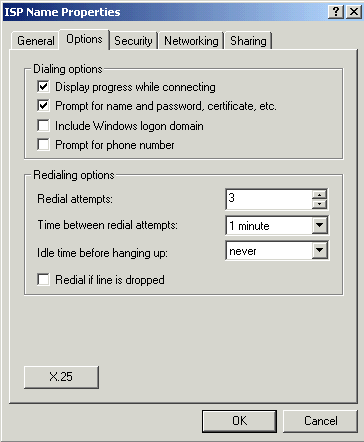
DUN Properties Resumed: Options Tab The options tab is pictured below. It's settings shouldn't interfere with a DUN connection so don't worry about it. <next: DUN configuration networking tab>
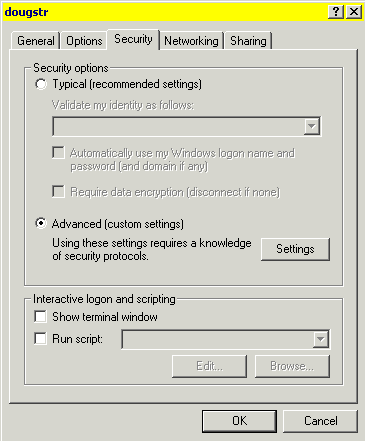
Security Tab: Skip the security tab and go to the very important networking tab which is covered next.
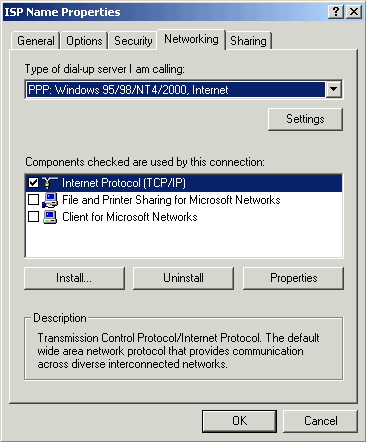
Networking Tab: The type of dial-up server should always be PPP. Make sure that Internet Protocol TCP/IP is selected. You only need Client For Microsoft Networks installed if you will be doing any website development with Frontpage 98 or Frontpage 2000. <IMPORTANT: PPP settings button> <alternate: TCP properties button> <alternate: skip to installing network components>
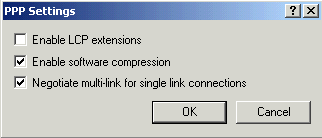
The PPP settings button window is shown below. You *should* be able to enable LCP extensions but disable them if you are having problems connecting. LCP extensions and software compression improve connections in most cases. Multi-link is only necessary for "shotgun" connections where customers combine more than one phone line into a bigger connection. [This requires two separate dial-up accounts to work.]
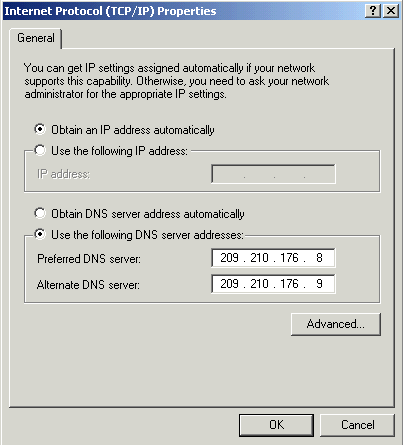
TCP/IP Settings: The TCP/IP properties are very important. Dynamically assigned DNS settings won't rollover into the secondary DNS server if the first one overflows. Thus, you must select "use the following DNS server addresses" and plug-in 209.210.176.8 and 209.210.176.9 as shown below. Select "obtain an IP address automatically" unless you are paying extra for a static IP address. Don't worry about the advanced button. Click OK. <next: installing network components> <alternate: sharing tab if connecting multiple workstations on a LAN>
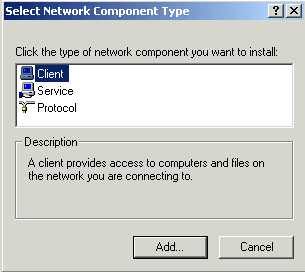
Installing Clients, Protocols & Services: You can install network components from a dial-up connections properties window at the networking tab. You can also install network components for all DUN connections by opening the network and dial-up connections window and clicking the "add network components" hyperlink. Either route will bring up the window shown below. The installation is very similar to a Win9X installation. Double-click "client" to install Client For Microsoft Networks if they need that for Frontpage 98 or Frontpage 2000. Double-click "protocol" to install TCP/IP. <next>
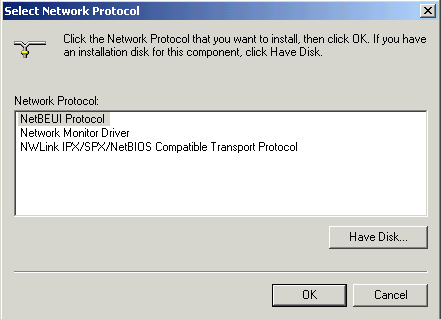
Double-click TCP/IP to install that protocol. Note: The following window does not show that option because the screen shot was taken from a computer that already had TCP/IP installed. If you don't see TCP/IP as an option then your computer thinks that it is already installed. You might need to remove that TCP/IP installation so that you can reinstall it. Be sure to restart the computer after removing the old TCP installation but before you install the new TCP. <next: LAN sharing>
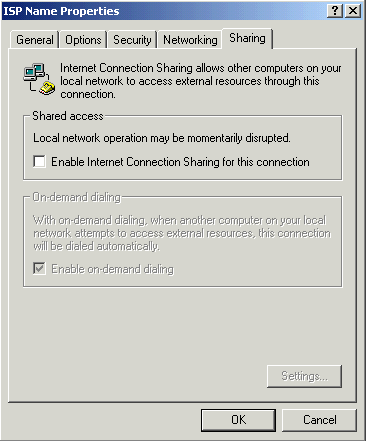
LAN Sharing: The sharing tab of the DUN properties is where you can setup a workstation to allow other workstations on the same LAN to use that workstation's internet connection. The workstation acts like it is a router for those other workstations. The other workstations *should* have their own connection that they are paying for. Also, only one of those connections can be "live" at any given time. ISPs will not provide tech support for letting other users "coat tail" on a single paid connection.
<return to top> <return to windows page>
Last Update: Thursday, July 03, 2003 |
