|
|

|
|
|
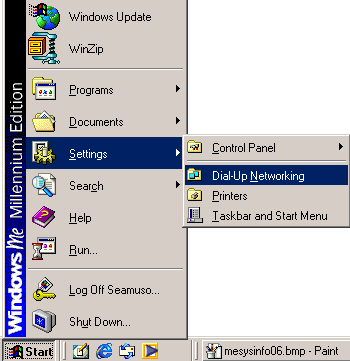
Setting Up An Internet Connection In Windows ME Quick Links: | Setting Up A New Connection | Checking An Existing Connection | Desktop Shortcut | Other Pages: | Diagnostic & Restore Functions | Browsers | E-Mail | Main Page | Special Challenges For Lucent WinModems | You setup your internet connection in a place called "dial-up networking." The first part of this tutorial shows you how to get there. The second part shows you how to setup a new internet connection. The third part shows you how to check and "tweak" those settings for improved performance. The last section of this tutorial will show you how to create a "shortcut" on your desktop to get to your internet connection more easily. Getting Into Dial-Up Networking: There are several ways to get into your dial-up networking component of Windows ME. The easiest is pictured below. Just click the "start" button in the lower left corner of your screen. Put your pointer over the "settings" option and a window will pop-up to the right. Click on the dial-up networking option.
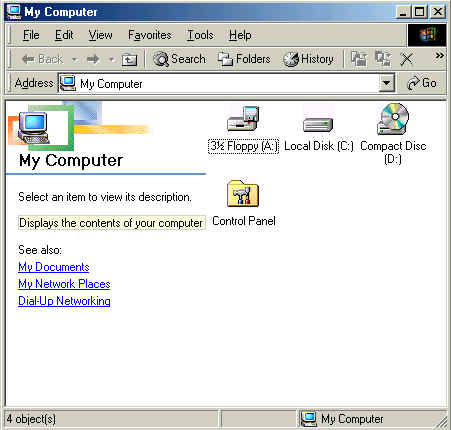
Another route to dial-up networking is to click on your "My Computer" icon (pictured below).
Your "My Computer" window won't show a folder for dial-up networking (unlike earlier versions of Windows). However, it will have a blue hyperlink to dial-up networking in the left side of the window as shown below. Click that link to get into dial-up networking.
The following window is what the dial-up networking window looks like. There will always be a "make new connection" option. (Don't ever try to delete that.) You will also see any other internet connections that have already been setup on your computer. For example, the following picture has two internet connections already setup. One is called DUN and one is called www. We suggest that you delete any old connections that are no longer being used. We will begin by choosing the "make new connection" option. If you already have a connection setup then use the following link to get to your configuration options without creating a new connection. <click here to skip to configuration options> Otherwise, let's double-click on "make new connection" and go from there.
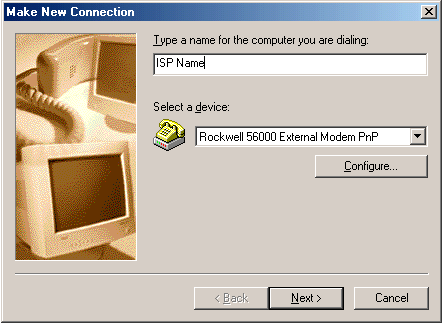
Begin by naming the connection. We recommend naming the connection after the ISP that will be used with that connection . This will make it easier to tell which connection goes to which ISP if you have more than one ISP. <Note: You need a separate dial-up networking connection for each ISP that you use.> Windows ME will automatically put in your modem in the second box. If you have more than one modem then you can click the little black arrow at the far right of the box to select a different modem. Just be careful that you pick a modem that is actually installed. After you've filled-in the boxes, click the "configure" button to make sure that your modem has the right settings. These settings will be covered next.
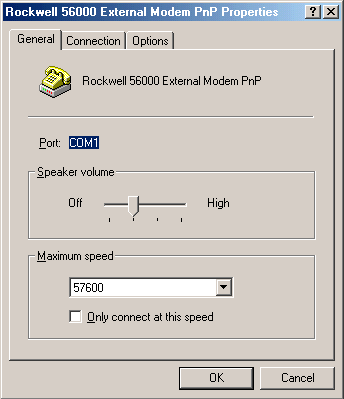
The modem configuration options are pictured below. It is usually a good idea to have the speaker volume turned on. This will give you valuable feedback in case the number is being dialed incorrectly. For example, you may hear an operator's message telling you that the area code has been changed. That would let you know that you need to reset your local dial-up number with a new area code if needed. You also need to select the correct modem speed. Some people mistakenly think that picking a very high speed will improve their connection. For example, they might choose a 115,000 speed connection for a 56,000 speed modem. This will cause you to have a very unstable connection so pick the right speed. Once you have these settings, click the connection tab at the top of the window to get to the next section.
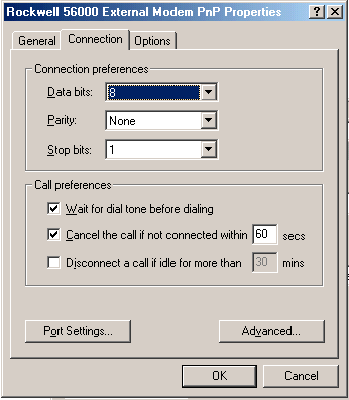
The ideal settings for the connection tab are pictured below. You shouldn't change those settings unless you know exactly what you are doing. It is an especially good idea to have a checkmark to wait for a dial tone before dialing. Otherwise, you might get a busy signal that is simply caused by a misdialed number. Also, you don't want to cancel the call if not connected in under sixty seconds. It takes some time for your computer to make the call and negotiate a connection. You don't want to cancel the call prematurely. The one option that you can change to suit your preferences is the disconnect if idle option. If you tend to leave your computer unattended and forget to log-off then you can set that to disconnect after any time frame up to 120 minutes. Don't forget that you've set that if you do so. Many people complain to their ISP that they are getting knocked off prematurely after 20 minutes (for example) when it is their own computer that is disconnecting them after 20 minutes because of that setting. If you have an internal 56k modem then there is a very good chance that it is a "win" modem. Win modems require a special form of "data flow" to get stable connections. If you find that you keep getting disconnected within a few short minutes of connecting then you probably have the wrong "data flow" setup. Click the advanced button in the lower right corner to reset that.
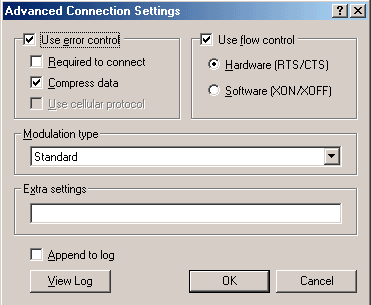
This is where you set a "win" 56k modem to use software data flow. Most computers assume that you will need hardware flow control but most internal 56k modems actually need the software flow control. The most common win modems are listed here. LT Win 56k; US Robotics 56k Win modem; HSP Micromodem (and anything else with an HSP in the name); SupraMax 56k; PCTel; Shark; Motorola SM56; ESS; Zoltrix. Advanced users can also set an "init string" in the extra settings box. Don't do this unless you know exactly what you are doing. A bad init string can cause your computer to think that there is no modem installed. It can also cause that modem to not work correctly. If you have an internal 56k modem and you just can't get a stable connection due to your phone lines or your modem software, you might want to fix that problem by putting in a V34 init string. This will cause your modem to connect at only 34 kbps but at least you'll have a reliable connection. The two most popular V34 init strings are AT+MS=V34 or ATS37=19. Only use one of them and don't put in any extra spaces. Click OK to exit back to the main setup window.
The following window is where you want to return. Click the "next" button when you get here.
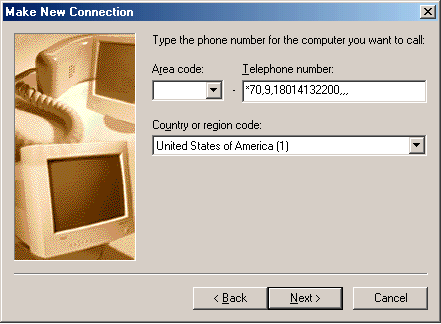
This is where you put in the phone number that you use to connect to your ISP . We've found that it is best to put the full number the exact way that you want it dialed into the second box as pictured below. Dialing rules can do some fancy things including some pretty fancy screw-ups. Why take that chance when you can just force the correct dialing in this second box? There are a few tricks. You can disable call waiting by putting *70, (including the comma) in front of the number. Just keep in mind that most secondary data phone lines don't have call waiting even if your main phone number does. Be sure to put 2 or 3 commas at the end of the phone number. This will help your computer to get a more stable connection. This is especially important if you have a win modem. If you are in a hotel or workplace where you need to dial a 9 to get an outside line then add 9, (including the comma) to the front of the number. If you are in an area that requires "10-digit dialing" where you have to dial your area code even when you make local calls then be sure to put in the area code in the phone number box. (Leave the designated area code box blank.) Click "next" when you are ready.
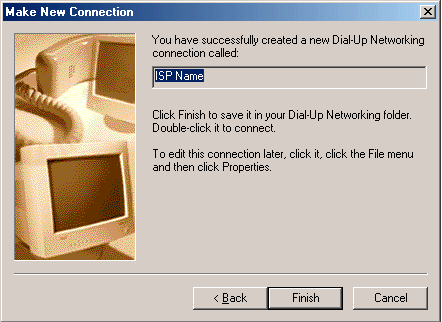
This completes the setup wizard. Hit the "finish" button or use the "back" button if you need to go back and make some changes.
You now have an internet connection setup. However, you need to do a few more things which are covered in the next section.
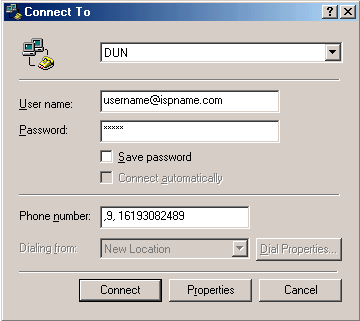
Checking Your Connection Settings: Open your dial-up networking window if it isn't already open. <click here for instructions if needed> Double-click open your internet connection to see the following window. Make sure that you've got the correct username with @ispname.com (putting in your own ISP information). Make sure that you've got a password in there even though it will look like ***** rather than showing you the actual password. Keep in mind that usernames and passwords are caSe SEnsITive so make sure that you've got the correct capitalization. If you put a checkmark in the "save password" option then your computer will automatically put in your password for you when you connect. Otherwise, you will have to put in your password each time that you connect to the internet. Make sure that the phone number is listed correctly. Adding two or three commas to the end of the phone number will also help you to get a more stable connection. Click the "connect" button to try to connect. Once connected, open your Internet Explorer or Netscape to go to websites. Open your e-mail program (such as Outlook or Outlook Express) to do e-mail. If you can't connect then click the "properties" button.
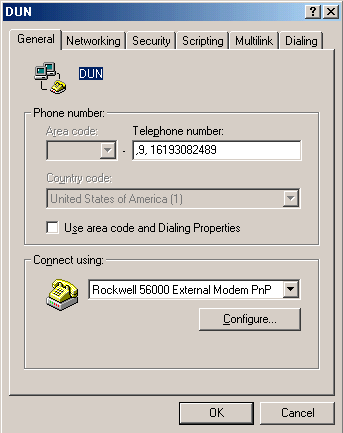
Each of your dial-up connections will have its own unique properties. The properties window is pictured below. We will begin in the "general" tab. This is where you can reset your phone number. Avoid using the "use area code and dialing properties" option because this stuff tends to be unpredictable. Just force the number the way that you want to dial it into the phone number box. For example, include the area code if you live in an area that requires you to dial the area code for local calls. (10-digit dialing areas) Put a 9, (including the comma) in front of the number if you need to dial a 9 to get an outside line. (hotels & workplaces often require the 9) You can even put a *70, (including the comma) to disable call waiting so that you don't get bumped offline every time that you receive a call. Just remember that secondary phone lines usually don't have call waiting even if the primary phone line to your house does have call waiting. The modem configuration button after the following picture. Click the "configure" button to get to those options.
The modem configuration options are pictured below. It is usually a good idea to have the speaker volume turned on. This will give you valuable feedback in case the number is being dialed incorrectly. For example, you may hear an operator's message telling you that the area code has been changed. That would let you know that you need to reset your local dial-up number with a new area code if needed. You also need to select the correct modem speed. Some people mistakenly think that picking a very high speed will improve their connection. For example, they might choose a 115,000 speed connection for a 56,000 speed modem. This will cause you to have a very unstable connection so pick the right speed. Once you have these settings, click the connection tab at the top of the window to get to the next section.
The ideal settings for the connection tab are pictured below. You shouldn't change those settings unless you know exactly what you are doing. It is an especially good idea to have a checkmark to wait for a dial tone before dialing. Otherwise, you might get a busy signal that is simply caused by a misdialed number. Also, you don't want to cancel the call if not connected in under sixty seconds. It takes some time for your computer to make the call and negotiate a connection. You don't want to cancel the call prematurely. The one option that you can change to suit your preferences is the disconnect if idle option. If you tend to leave your computer unattended and forget to log-off then you can set that to disconnect after any time frame up to 120 minutes. Don't forget that you've set that if you do so. Many people complain to their ISP that they are getting knocked off prematurely after 20 minutes (for example) when it is their own computer that is disconnecting them after 20 minutes because of that setting. If you have an internal 56k modem then there is a very good chance that it is a "win" modem. Win modems require a special form of "data flow" to get stable connections. If you find that you keep getting disconnected within a few short minutes of connecting then you probably have the wrong "data flow" setup. Click the advanced button in the lower right corner to reset that.
This is where you set a "win" 56k modem to use software data flow. Most computers assume that you will need hardware flow control but most internal 56k modems actually need the software flow control. The most common win modems are listed here. LT Win 56k; US Robotics 56k Win modem; HSP Micromodem (and anything else with an HSP in the name); SupraMax 56k; PCTel; Shark; Motorola SM56; ESS; Zoltrix. Advanced users can also set an "init string" in the extra settings box. Don't do this unless you know exactly what you are doing. A bad init string can cause your computer to think that there is no modem installed. It can also cause that modem to not work correctly. If you have an internal 56k modem and you just can't get a stable connection due to your phone lines or your modem software, you might want to fix that problem by putting in a V34 init string. This will cause your modem to connect at only 34 kbps but at least you'll have a reliable connection. The two most popular V34 init strings are AT+MS=V34 or ATS37=19. Only use one of them and don't put in any extra spaces. Click OK to exit back to the main properties window.
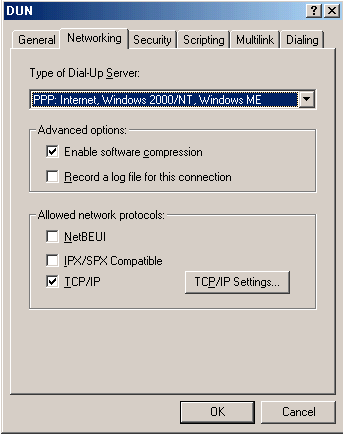
Once you've finished setting up the modem configuration options and the general tab of the properties window, click the networking tab at the top to see the following window. Your type of dial-up server will always be "PPP: Internet, Windows 2000/NT, Windows ME." If something else is selected in that top box then click the little black arrow at the far right of the box to choose the correct option. You don't need to record a log file. That will just waste space on your computer. You probably do want to enable software compression because that will improve the speed and efficiency of your internet connection. You don't need NetBEUI or IPX/SPX to connect to a regular ISP. You may need IPX/SPX to connect to a workplace Novell network but you will be setting up a separate dial-up connection to connect to that workplace connection if you even have one. Regular ISP connections pretty much never use IPX/SPX or NetBEUI so don't slow down your internet connection by putting checkmarks in those options. You MUST have TCP/IP enabled. That is fundamental to any ISP connection. Once you've got that enabled, click the TCP/IP Settings to setup that important stuff.
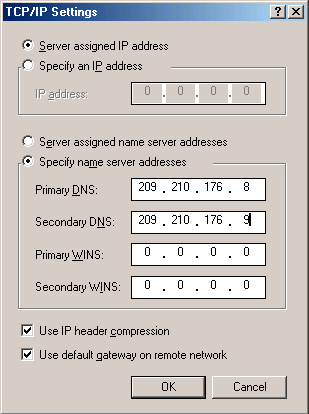
This is where you set your DNS numbers. Select "specify name server addresses" and then enter in the numbers exactly as pictured below. The primary DNS is 209.210.176.8 and the secondary DNS is 209.210.176.9. You also want to make sure that you have checkmarks in the bottom two options for IP header compression and the default gateway. You do not want to put in any numbers in the WINS boxes. Just leave the zeros there. Also, you don't want to specify an IP addressunless you've paid extra to purchase one from your ISP. (That's very unusual). Just leave the top selection for server assigned IP address. You will get a different IP address every time that you connect to your ISP. Don't worry about that. It's technical stuff that you don't need to know about unless you are an expert systems administrator. Hit OK to return to the networking tab window.
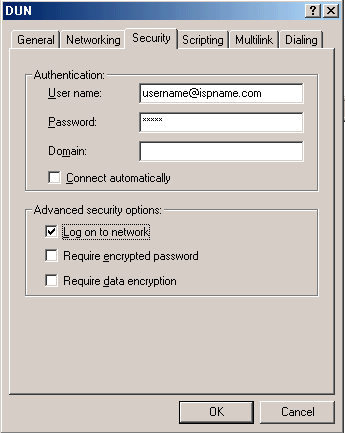
Click the security tab to see the window below. Put in your username (including @ispname.com where ispname is the name of your ISP). Put in your password. Leave the domain blank. Add a checkmark for "log on to network" if you use Frontpage for website development. Otherwise, it's not necessary. Do NOT put in a checkmark for the encryption options. That will definitely prevent you from connecting to your ISP. Ignore the scripting tab and click on the multilink tab.
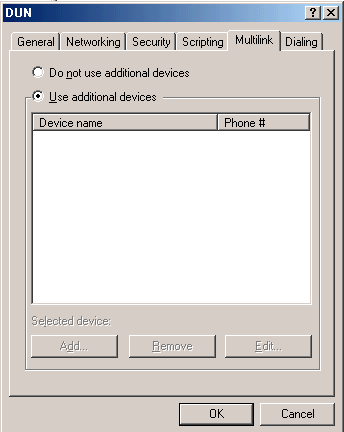
The multilink tab is where you can setup "shotgun" technology to connect to your ISP using two separate phone lines and two separate modems for double the speed. You will also need two separate accounts with your ISP. Most people don't use this option but it is an option. Just click the "add" button to tell your computer to use the second modem in your computer. Click the dialing tab.
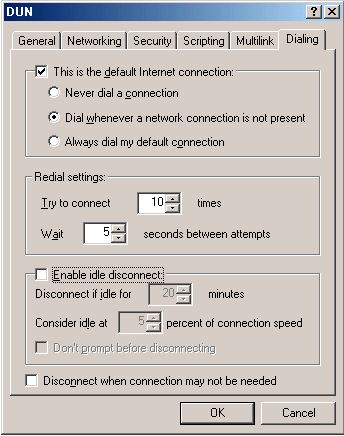
The dialing tab is where you setup your computer to use this internet connection. Make it the "default internet connection" with a checkmark and choose "always dial my default connection." You can "enable idle disconnect" to disconnect from your ISP after a set time frame in case you leave the computer and forget to disconnect. You can also leave that disabled to stay connected for long periods of inactivity. Be careful about putting a checkmark in the last option where it can "disconnect when connection may not be needed." This can cause unwanted disconnections when you close your e-mail program or internet browser such as Internet Explorer or Netscape. Most people prefer to control when they disconnect. You're finished. Hit the OK button and try to connect again. If you still can't connect then write down any error messages and call your ISP for assistance.
The next section will help you to create a shortcut link on your desktop to connect to the internet.
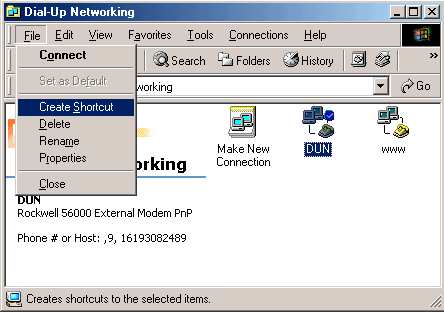
Creating A Desktop Shortcut: Open your dial-up networking window. You will see your various internet connections. For example, the following screen shot is taken from a computer that had two internet connections: DUN and www. Click to highlight your connection and then click the file menu to choose "create shortcut" as shown below. You can also right-click on the connection to create a shortcut.
A window will pop-up to tell you that you can't create a shortcut here. You didn't want it there, anyway. Click the "yes" button to put the shortcut on your desktop.
The shortcut will look like the picture below. Click on it to connect to the internet. Don't forget to open your browser (Internet Explorer or Netscape) or your e-mail program to actually go places on the internet after you've gotten connected.
You don't necessarily have to use a shortcut to connect to the internet. You can setup Internet Explorer, Netscape, Outlook, Outlook Express and many other programs to automatically make that connection for you. Go to the browsers section to setup Internet Explorer or Netscape for surfing. Go to the e-mail section to setup your e-mail program. Links are provided below. You might also want to go to the "diagnostic & restore functions" page if you are having problems with your internet connection. There is also a link for that below. <return to top> <diagnostic & restore functions> <browsers> <e-mail> <main page>
|
