|
|

|
|
|
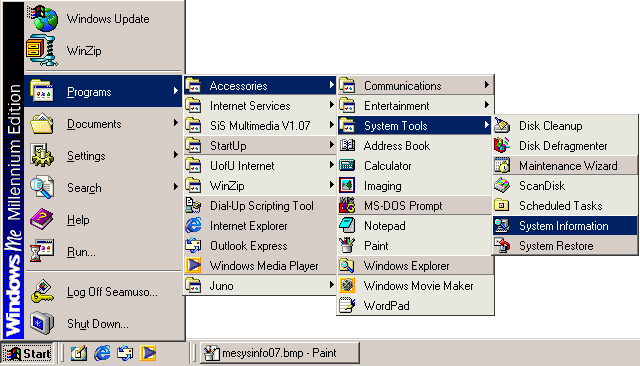
System Restoration & Diagnostics For Windows ME Windows ME Millennium Edition has some really useful diagnostic and repair tools. You get to them by clicking the start button in the lower left corner of your screen. Place your pointer over programs to get a second pop-out window to the right. Put your pointer over accessories and then system tools as shown below. There are several useful options. Disk Defragmenter will repack your hard disk memory for improved performance. You should do that about once a month. Scan Disk will check your hard drive for damage. Do this if your computer starts behaving strangely. System Restore will let you take your computer back to its settings at a prior date. This is useful if one of your programs becomes damaged. It is also a good way to recover if you load a program that doesn't install correctly. It is also the only way to reinstall your dial-up adapter if it gets deleted or damaged. We'll cover the details on this program in more detail in a little bit. Let's begin by choosing the System Information option.
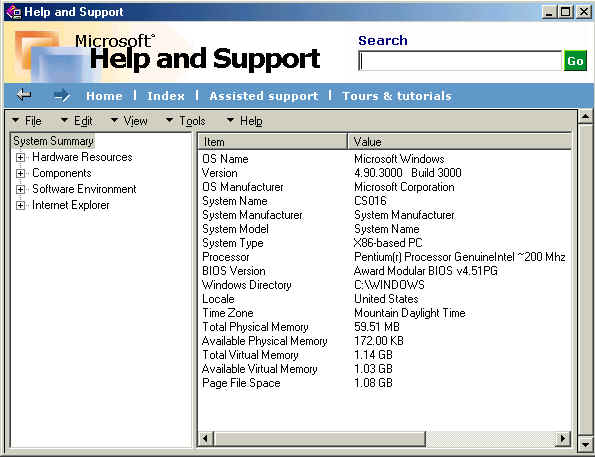
The system information program has some pretty useful features. Its main window is pictured below. It tells you what kind of processor (CPU) is installed. It tells you how much RAM "physical memory" is installed and how much of that is being used. There are also links to some tours and tutorials for learning more about using your Windows ME system. There are some "menus" in the gray bar towards the top: File, Edit, View, Tools & Help. Click the tools menu and a drop-down will give you more options.
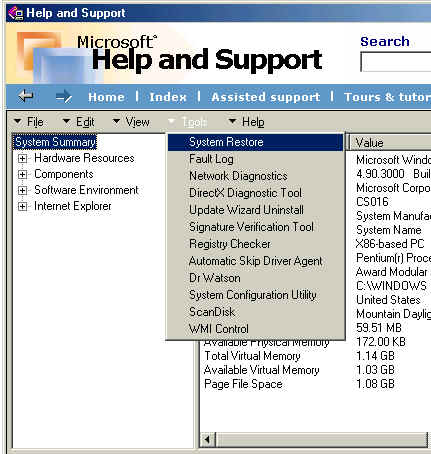
The tools menu options are shown below. The Registry Checker is a very useful option. If your computer is behaving strangely then you can run that program. The computer will check the registry to make sure that all of your operating system components are working properly. If not, it will give you the option to let it fix any damage. The other really good option is System Restore. This is the same program that we mentioned earlier for returning your computer to its setup from a prior date. We'll cover that next.
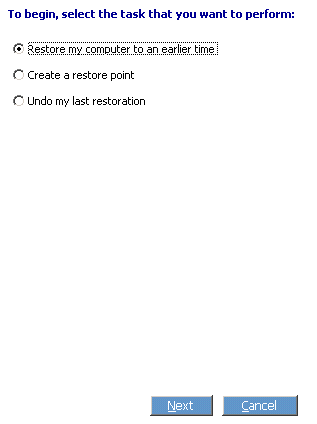
The basic system restore screen is pictured below. It's a good idea to create a "restore point" before installing new software. Your computer will also periodically create "restore points" on its own. Click in the little circle to the left of "restore my computer to an earlier time" and then click the "next" button several inches below that. Note: If your operating system is so screwed up that you can't get anywhere then restart your computer in "safe mode" by holding down the f8 key during the restart. You can use the system restore program from safe mode to get back to a system setup that existed prior to the problems with your computer.
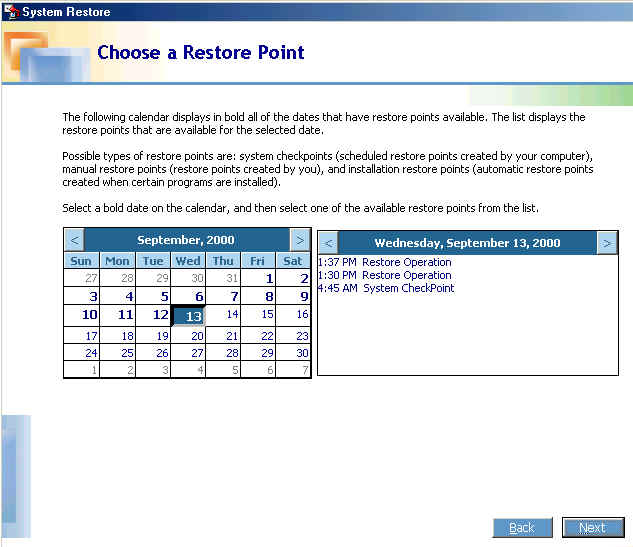
You will see the following screen. Click in the calendar to choose the date that you want your computer to return to. If there is more than one restore point on that date then you will have to choose one of them in the box to the right of the calendar. Click the "next" button in the lower right corner after you've chosen a restoration point. When picking a date, choose the last time that your computer was working correctly. You want to return to that condition so don't pick a time after the time when your computer first started to have problems.
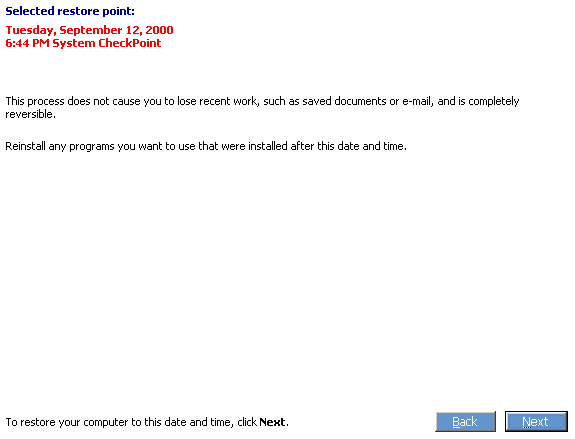
You will see the following confirmation page before the restoration takes place. Keep in mind that you won't lose any documents or e-mails that you've received or created after the time of the restoration. However, you will lose any new programs that you've installed after the time chosen for restoration. You will need to reload those programs again. For example, let's assume that it is Wednesday. You installed a new program on Tuesday and you are restoring your computer back to its setup on Monday. You will need to reinstall the program that you loaded on Tuesday. Programs that you loaded last week won't be effected. Click the "next" button to do the restoration.
Welcome back to yesterday. Your computer has been returned to the operational status that it had back then. <return to top> <internet connection setup> <browsers> <e-mail> <main page>
|
