|
|

|
|
|
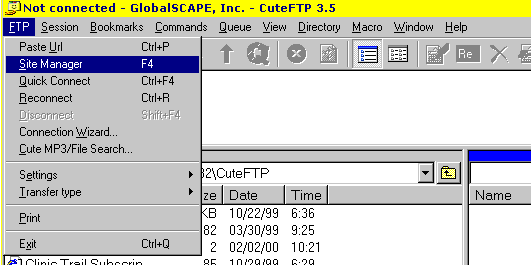
(Click Here for Version 4.X Screen Shots) CuteFTP is an easy and powerful application. You can download shareware versions of this program at www.tucows.com or www.download.com. The shareware continues to work after 30 days but it will only allow single file transfers after the 30 day expiration. You will not be able to drag & drop entire directories after 30 days without registering the software or hacking it. Just close the "nuisance screen" to use the program after 30 days. Open CuteFTP and go through the "nuisance screen" if necessary. The top window shows session activity. The left window shows the initial remote directory designated for your computer. That window defaults to the GlobalScape folder. Most people prefer to set that to their desktop. The right window shows the contents of your ftp directory. The bottom window shows the "queue" of documents waiting to be uploaded from your computer to your ISP's computers or downloaded from your folder on the ISP's computer to your own computer. Click the FTP menu (as shown below) to open the Site Manager. <next>
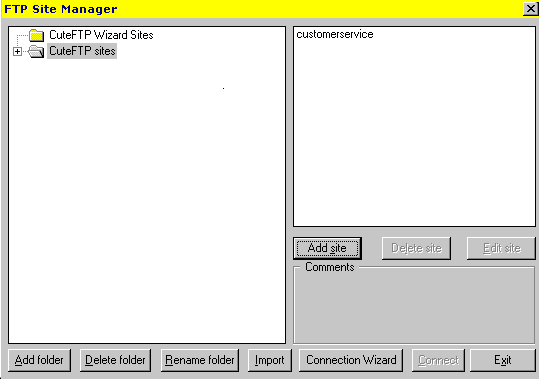
The screen below is a typical Site Manager with one ftp connection named "customerservice" already setup in the box on the right. Click the "add site" button to create a new directory setup. Click the "edit site" button to reconfigure an already setup directory. <next>
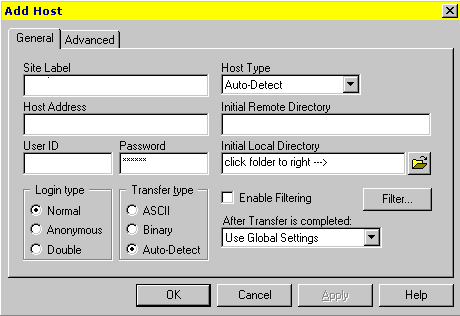
The "add site" button will be titled "add host" but it is exactly like the "edit site" button otherwise. Set the "site label" box to the ftp directory name. Set the appropriate "host address" as users.ispname.com. Set the username and password. This will be your standard login for the Internet and will look something like username@ispname.com. Leave the Initial REMOTE Directory blank. When you login to our computer system, your User ID will route you to the right place automatically. Set the Initial LOCAL Directory by clicking the button with a folder picture and browsing to the desktop, C drive or any other place on your computer. Leave all other settings at their default settings. ISP Personal Website Sample: <next>
Click "OK" to get to the next window. Be sure to login to the Internet like you always do before trying to connect from the next screen.
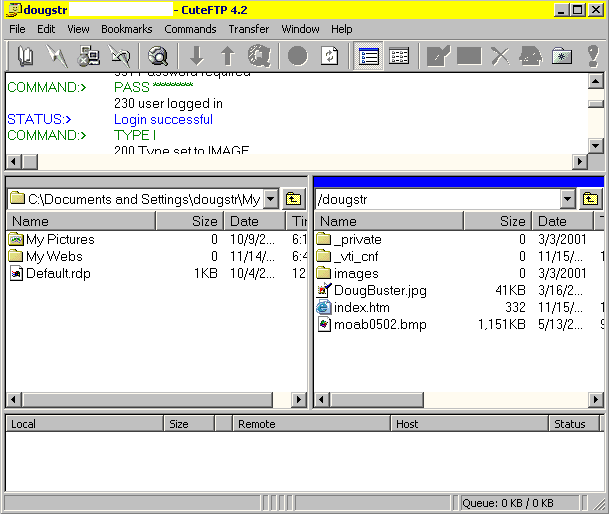
Hit the connect button (after you're actually connected to the Internet first) to login to that ftp directory. (The sample above has Connect grayed out but it's the second button in the lower right corner.) A successful logon will result in the screen below. <next>
If the site manager is correctly configured but you still can't log in then contact the Web support group at your ISP to check the addressing and settings. Be sure to specify that you are using CuteFTP Version 3 so they will know which program you are using. You can now upload files from your computer to the main ISP computer that will make your website available to the world on the Internet. The middle box on the left (with "My Pictures" in the sample below) is your home computer. You can click the little dropdown arrow to point to anywhere on your computer including your desktop. The middle box on the right (with "_private" in the sample below) is your web folder on the main ISP computer. You can click, hold down and drag & drop files back and forth between these two systems.
<return to top> <CuteFTP 4X Screen Shots> <windows home page>
|


