|
|

|
|
|
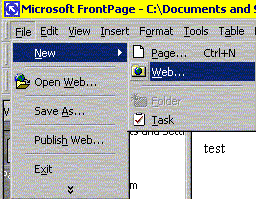
November 2002 Update: We've made changes to the way that FrontPage works with our system. You can no longer edit pages directly on our main server. You will need to create the page on your home computer and then use the "Publish Web" feature to post it to our computer system for worldwide viewing. You can also upload the material using an FTP program. This page tells you how to start a website in FrontPage and then publish it to the world. Sorry. We no longer support counters, banners & ASP functionality on our personal websites. Quick Links On This Page: | How To Open A Website | How To Publish A Website | Quick Links To Other Pages: | Basic Page Design | Creating A New Page | Inserting Pictures | Creating Hyperlinks | How To Start Or Open A New Website: You need to begin by opening FrontPage 2000. Click the "File" menu at the top. Put your pointer over the "New" option and choose "Web" to get started. (Note: If you've already got a website started then simply choose the "Open Web" option under the File menu.)
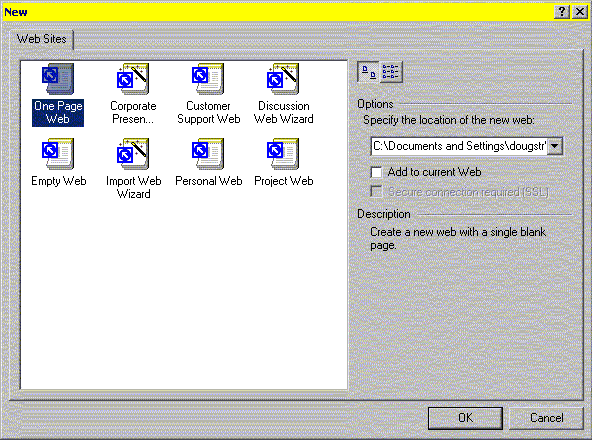
There are several options but let's keep it simple and choose the "One Page Web" route. It will automatically create a blank page called "Index.htm" which will be your home page. Make sure that the location that you specify for your new web (right panel) is somewhere on your home computer. Even though your public website will be on our computer system, you need to create the website at home and later "publish" it to our system. Publishing is covered further down. Click OK after you've made your choice from the options pictured below.
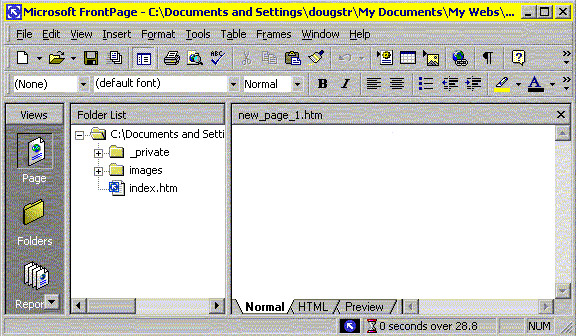
This is your main work window. As you can see, a page called "index.htm" is waiting for you. Just double-click it and the page will be visible in the right frame for you to edit. Basic page design is covered at another location that you can reach from the links at the top of this page. Before you go to that material, you need to learn how to "publish" your web page. We're covering that below. New websites will have a _private folder and a images folder created automatically. If you don't see them in the "Folder List" then click the Page button in the left frame under the Views category.
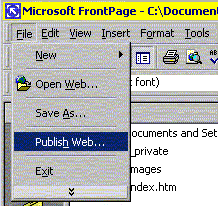
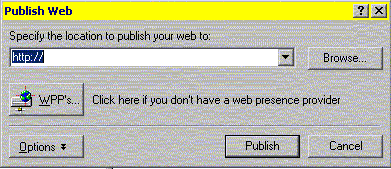
How To Publish Your Website To The World: Once you've got your website ready for publication on the Internet, save your material on your home computer then click the File menu in the top left corner and choose the "Publish Web" option pictured below.
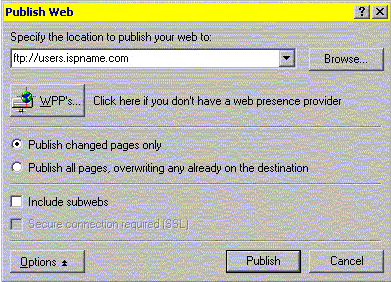
If you've published that website before then you will probably see the address in the box already. Otherwise, you will see "http://" as pictured below. We need to change that but let's start by clicking the little arrows to the right side of the Options button in the lower left corner of the window below. This will give us a little more control of the publication.
The extra options allow you to publish only updated pages or to overwrite all previous pages. If the website is large and you're on a modem connection then you would probably want to only publish changes to an existing website. On the other hand, the "Publish all pages" option can be useful when needed. The most important part of this window is the input of the location in the top box. Don't put the address (URL) of your website in there. You need to connect to our computer system first. Once you've got the correct location in the top box, you're almost ready to click the "Publish" button at the bottom. You just need to make sure that you're connected to the Internet first. Once connected, click the "Publish" button to move your website from your home computer to the public Internet.
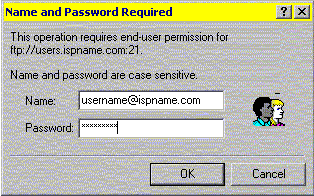
A window will pop-up to ask for your name & password. This keeps strangers from changing your website and it also tells our system which folder you are editing.
Congratulations. You have just published your new website to the entire world. These are the basics. You probably want to learn how to create pages for your new website. We have other pages for doing that as well as creating hyperlinks and inserting pictures. Click here to go back to the top of this page for those additional options. |
