|
|

|
|
|
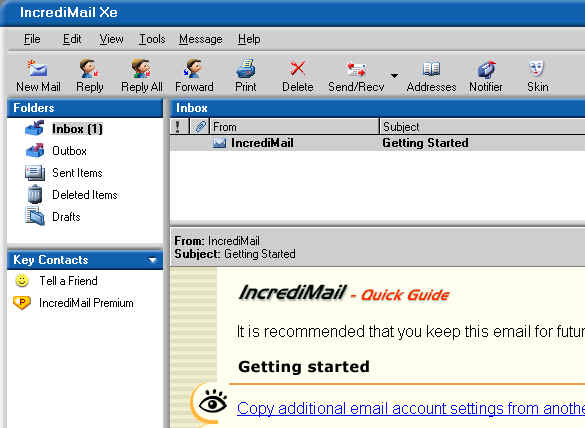
Quick Links This Page: | Tools/Accounts | General Properties | Servers Tab | Advanced Tab | Tools/Options | Related Pages: | New Account Setup Wizard | Identities For Privacy | IncrediMail XE is very similar to Outlook Express and Outlook 2000. It looks a little different and has a few minor variations. This web page will show you how to check your e-mail settings and tweak a few options so that you can use Incredimail to send & receive e-mail. If you want to setup IncrediMail for the first time then choose the "New Account Setup Wizard" link just above to see those instructions. Before we get into checking the settings. Here are some basics for new people on the Internet. The basic IncrediMail program is shown below. Click the "New Mail" button at the top to write a new e-mail to a friend. The "Inbox" to the right of the folders will list all e-mails that you've gotten from your last connection to the Internet. For example, this picture shows one message from IncrediMail. It's subject line says "Getting Started" and you can see the message if you double-click it open. Hit the "Reply" button to send a response to the sender. If multiple people got the message, you can use the "Reply All" button to reply to all of them and not just the sender. Clicking the "Forward" button will enable you to send the original message to someone else. And lastly, you can save frequently used e-mail addresses in the address book. Just click the "Addresses" button at the top to get into that. Begin by opening IncrediMail. (There is probably a shortcut on your desktop to the program. If not, click the Start menu on your computer and look for IncrediMail in your programs.)
We're going to check your e-mail settings. Begin by clicking the Tools menu at the top and choosing the Accounts option as pictured below.
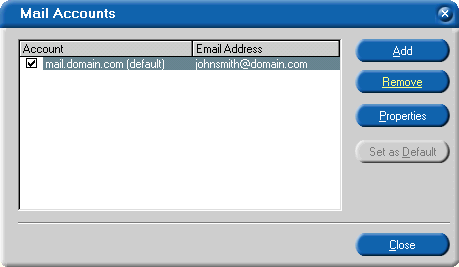
A new window will pop-up as shown below. It will list all of the e-mail accounts that are setup in IncrediMail. You can use this program to check a bunch of different accounts. If you have multiple accounts then click to highlight the one that you want as the "default" account. Click the "Set as Default" button and IncrediMail will assume that you want to send all messages from that account unless you tell it otherwise. Be sure to remove old accounts from prior ISPs. Just click to highlight them and click the Remove button on the right. This won't cause you to lose saved e-mails from the past. This will just keep your computer from trying to connect to a mail system that is no longer current for you. That causes needless errors because your computer won't know that the old accounts no longer work. We're going to check the settings of mail accounts that are already setup on your computer. If you want to tell your computer to check a new account then you will need to use the "Add" button and those instructions are available on a different web page. <Click here for instructions on setting up a new mail account.> Click to highlight your e-mail account in the box on the left then click the Properties button on the right to check its settings.
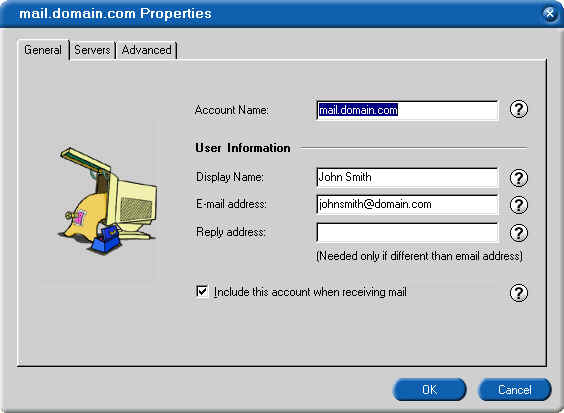
A new window will pop-up. It will look like the one pictured below. It will begin in the General tab. The information in the account name box doesn't really matter. We recommend naming it after your e-mail account name. This will help you to distinguish it from other e-mail accounts in the box covered just above. The display name box sets what people will see when they receive e-mails from you. This doesn't have to match your mail account name. Many people put their nickname in this box. On the other hand, the e-mail address box must exactly match your e-mail address. Leave the reply address blank and your program will automatically use your regular e-mail address. Be sure that you've got a checkmark in the last little box where it says "Include this account when receiving mail" because your program won't check for mail without this. If there is no checkmark then put your mouse pointer over the box and click on it to add the check.
The servers tab options are pictured below. You get to them by simply clicking on the word "Servers" at the top. These settings are very important so please be careful. Your incoming and outgoing mail server boxes will need something like mail.ispname.com in them. Some ISPs vary this addressing. You can get your actual mail server addressing from your ISP. Try using the "Ask The Expert" link on your ISP's home page in the help section. That is the easiest way to get your mail server addresses. The incoming mail server username will be the first part of your e-mail address. If you are santa@northpole.com then you would put santa in the box but not the @northpole.com part. You can also put in e-mail password and click the checkbox to remember that password. Don't worry that the password will look like little xxxxxs. If you are worried about privacy in your household then leave the password box blank. You will have to put in your password every time that you check your mail but you won't have to worry about snoopy family members being able to check your mail. (Note: Use the "Identities" options to completely keep your mail private. There is a link at the top of this page for seeing more about those options. With identities enabled, you can safely have IncrediMail remember your password for you because other members of the household won't be able to get into your profile.) Do not put a checkmark in "Log on using Secure Password Authentication" because this will totally prevent you from using your e-mail. On the other hand, you do want a checkmark in the very last option for "My server requires authentication." Click to put a checkmark in that box then click the Settings button and plug-in your mail username and password in the pop-up box.
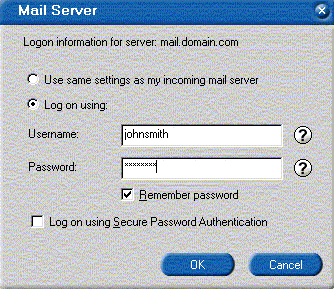
Be sure to click a black dot into the "Log on using" option so that you can put in your e-mail username and password. Once again, don't put a checkmark in the last box for "Log on using Secure Password Authentication" because that would disable your e-mail. Click OK when finished.
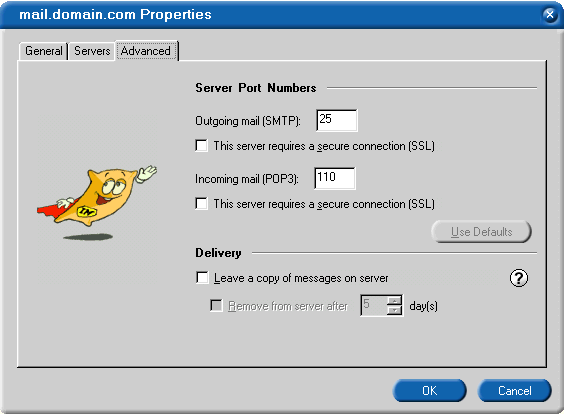
The advanced tab options are pictured below. Do not put checkmarks into the SSL options. This will disable your e-mail. Do not change the numbers in the boxes. That will also disable your ability to do e-mail. And lastly, don't put a checkmark in the "Leave a copy of messages on server" option. You will be saving e-mail directly to your computer at home. Leaving messages on the server will eventually fill your mailbox on your ISP's computers and this will cause you problems. Click the OK button at the bottom. You are finished checking your settings.
There are a few more options available. Click the Tools menu at the top and choose the very last dropdown where it says Options.
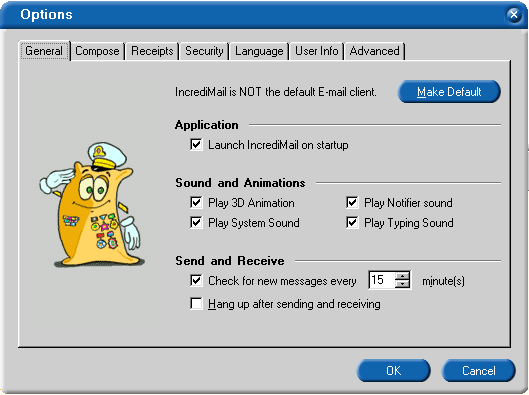
The general tab of the options section is shown below. Put a checkmark in the top option where it says "Launch IncrediMail on startup" only if you want your e-mail program to start automatically whenever you start your computer. You need a checkmark in the option to "Check for new messages every # minutes." Otherwise, your e-mail program will just sit there and not do any checking for new messages. Don't set this for more than every five minutes at a minimum. You don't want your computer checking e-mail non-stop because that will slow down other programs on your computer. Every 10 or 15 minutes is a good setting. Do not checkmark the last option where it says "Hang up after sending and receiving" or your computer will disconnect from the Internet every time you send or receive new e-mail.
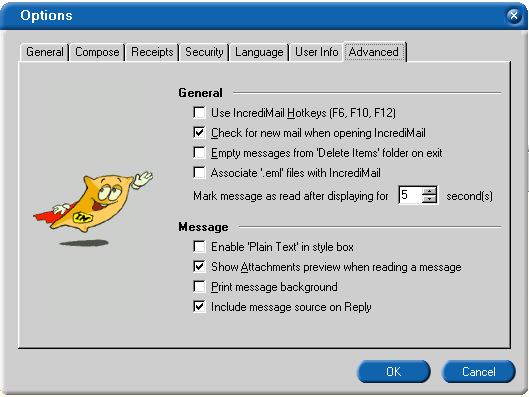
There is one other tab that you might need occasionally. It is the advanced tab shown below. Most people want checkmarks in the 2nd & 3rd options. As for the other options, don't worry about them. Just choose what you like.
Click OK. You're ready to do e-mail.
|
 IncrediMail XE (Build 532) Setup Instructions