|
|

|
|
|
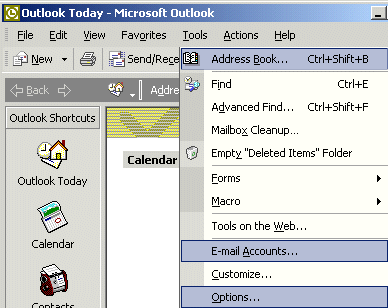
Quick Links Other Pages: | XP Connection Wizard | XP DUN Settings | XP MSN Explorer | Quick Links This Page: | New Account Setup | Checking Settings On Existing Accounts | Disabling The Auto Disconnect and Auto Dial Options | This tutorial will teach you how to setup Outlook XP (2002) to send and receive e-mails. We'll begin with the instructions for setting up Outlook XP for the first time. We will follow with a tutorial on how to check the settings on e-mail accounts that are already setup in Outlook XP. New Account Setup Begin by opening Outlook 2002. You will see a window similar to the one that is pictured below. Click the "Tools" menu at the top and you will get a drop-down window. Click on the "E-mail Accounts" option and a new window will pop-up.
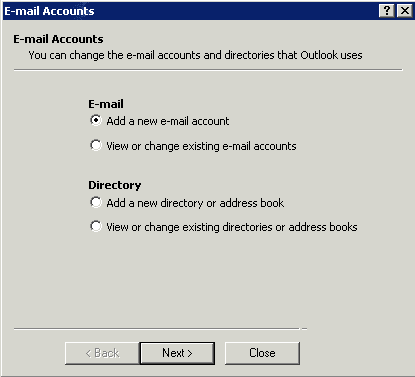
Click in the little circle so that it has a black mark in the "Add a new e-mail account" option. Click the Next button.
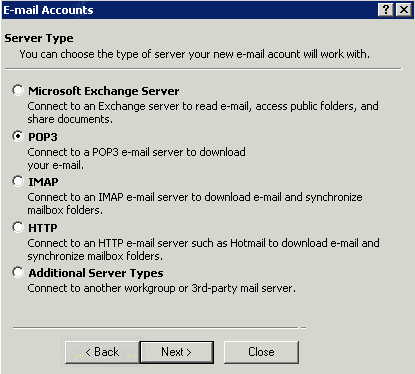
Click in the little circle to select the POP3 option with a black mark. Click the Next button.
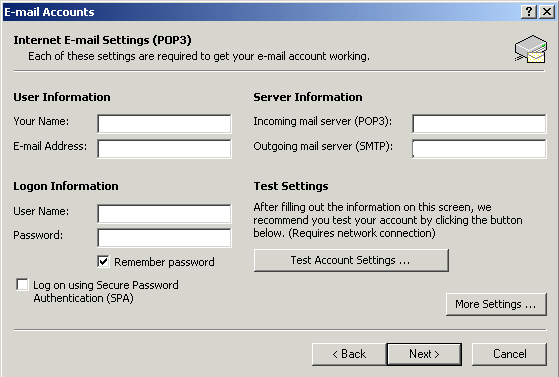
Fill-in the boxes. Your mail server address will be mail.ispname.com (or .net) depending upon your ISP. For example, if you were santa@northpole.com then your mail server would be mail.northpole.com for both the incoming and outgoing mail server. Meanwhile, your e-mails "User Name" (not necessarily the same as your dial-up login) would be santa for the santa@northpole.com account. Don't put a checkmark in the box that says "Log on using Secure Password Authentication (SPA)" because you won't be able to use your e-mail with that option selected. Click on the "More Settings" button in the lower right corner after you've filled in the boxes.
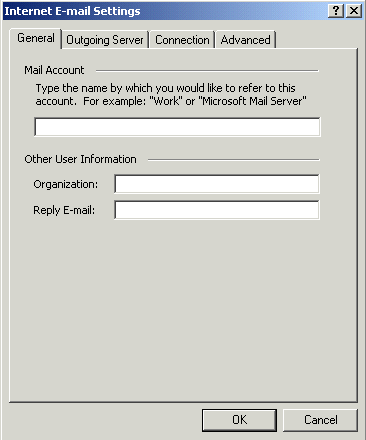
A new window will pop-up like the one pictured below. It will start in the General tab. The top box should have the name of your e-mail account so that you can tell it apart from your other e-mail accounts. "Organization" can be blank. The "Reply E-mail" is your e-mail address. Click where it says "Outgoing Server" at the top to change to the next tab.
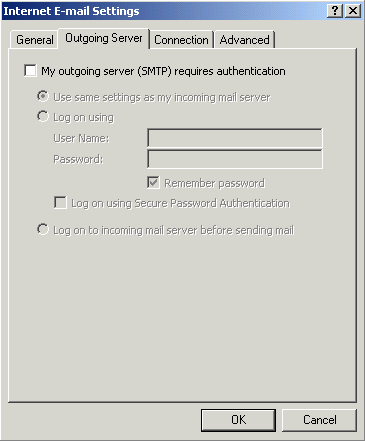
If you're ISP uses "SMTP authentication" then you need to have a checkmark in that box. SMTP authentication determines if your ISP requires you to login to send out e-mails. If you put in a checkmark then you also need "Use same settings as my incoming mail server" selected. (Note: If you are unsure then try sending with that selected and again without it selected. Whatever works is the correct setting. If in doubt, your ISP probably uses SMTP authentication to fight spamming.) Click the "Connection" tab at the top to get to the next window.
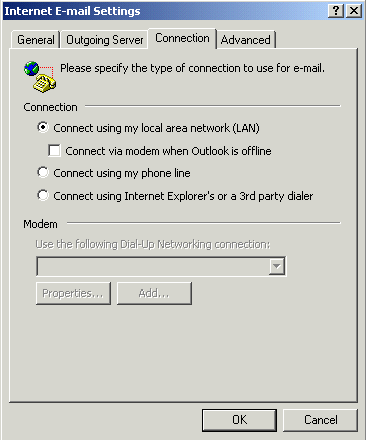
You need to select the "Connect using my phone line" option if you are on a dial-up modem connection. Once selected, make sure that the bottom box under "Modem" has your current ISP's connection for the setting. If not, click the little arrow at the far right of that box to choose your ISP's connection. (DSL connections need to select the LAN option.) As long as you're here, click the "Advanced" tab at the top for a quick tweak.
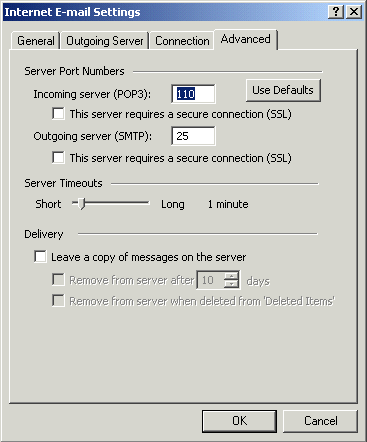
Leave the numbers in the boxes. Changing them will prevent you from using your e-mail. Also, do NOT put checkmarks into the "This server requires a secure connection (SSL)" options or you won't be able to connect. The "tweak" is to click and drag the "Server Timeouts" button to the far right of that little bar. If you can't figure out how to do this then don't worry but it is a helpful feature to have a long server timeout setting. Don't select the option to "Leave a copy of messages on the server" or you will quickly max out your mailbox on your ISP's server. This option also tends to lose messages so leave that option unchecked. Click OK because you're finished configuring your e-mail settings.
You're back to the window below. Let's click the "Test Account Settings" button to test your e-mail setup.
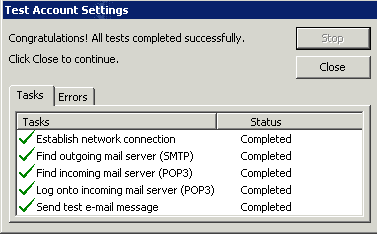
Outlook 2002 will check to see if it can connect to your ISP. It will also check to see if your settings can actually reach your ISP's mail server and logon. Lastly, it will send a test message to see if everything is working.
If any of your "Tasks" don't get a green checkmark then write down which ones don't. Go to the "Setting Up An Internet Connection" section of this website if you aren't getting a connection. Otherwise, call your ISP for 24/7/365 tech support. Be sure to tell the tech that you are using Outlook 2002 (XP) and that you did a test connection which identified certain areas where you aren't able to use your e-mail. Those are the areas that didn't get a green checkmark. If you successfully tested your account settings then click the Close button. In the prior window, click the Next button and then click the Finish button in the final window. You're ready to e-mail your friends.
Checking Settings On Previously Setup Mail Accounts Outlook 2002 is setup to check your e-mail account already. This would be great except that something isn't working so you need to check your settings. Who knows? Maybe the kids have been playing engineer and they've changed something. This is where you would go to check your settings. Begin by opening Outlook 2002 (XP) to get to the main window below. Click the Tools menu at the top and a little drop-down window appears. Choose the "E-mail Accounts" option.
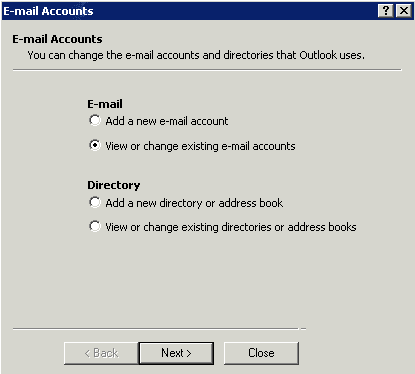
A new window pops-up like the one below. Click in the option to "View or change existing e-mail accounts" so that it has a little black mark in the circle. Click the Next button when done.
All of the e-mail accounts that are setup in Outlook 2002 will be listed in the main box. If there are old accounts from a prior ISP then delete them so that Outlook 2002 doesn't try to connect to the old ISP. This would cause serious connection problems and errors. Don't worry. You won't lose the e-mails from those accounts. This will just prevent your computer from looking for new messages on the former ISP. You do this by clicking to highlight the old accounts and then clicking the "Remove" button. Once the old accounts are removed, highlight your problem e-mail account by clicking on it. Click the "Change" button to the right to check that account's properties. (Don't hit "Finish" yet.)
Here is your main information window for that e-mail account. Each e-mail account will have its own information if your household has more than one e-mail account that gets used. Your mail server address will be mail.ispname.com (or .net) depending upon your ISP. For example, if you were santa@northpole.com then your mail server would be mail.northpole.com for both the incoming and outgoing mail server. Meanwhile, your e-mails "User Name" (not necessarily the same as your dial-up login) would be santa for the santa@northpole.com account. Don't put a checkmark in the box that says "Log on using Secure Password Authentication (SPA)" because you won't be able to use your e-mail with that option selected. Click on the "More Settings" button in the lower right corner after you've filled in the boxes.
A new window will pop-up like the one pictured below. It will start in the General tab. The top box should have the name of your e-mail account so that you can tell it apart from your other e-mail accounts. "Organization" can be blank. The "Reply E-mail" is your e-mail address. Click where it says "Outgoing Server" at the top to change to the next tab.
If you're ISP uses "SMTP authentication" then you need to have a checkmark in that box. SMTP authentication determines if your ISP requires you to login to send out e-mails. If you put in a checkmark then you also need "Use same settings as my incoming mail server" selected. (Note: If you are unsure then try sending with that selected and again without it selected. Whatever works is the correct setting. If in doubt, your ISP probably uses SMTP authentication to fight spamming.) Click the "Connection" tab at the top to get to the next window.
You need to select the "Connect using my phone line" option if you are on a dial-up modem connection. Once selected, make sure that the bottom box under "Modem" has your current ISP's connection for the setting. If not, click the little arrow at the far right of that box to choose your ISP's connection. (DSL connections need to select the LAN option.) As long as you're here, click the "Advanced" tab at the top for a quick tweak.
Leave the numbers in the boxes. Changing them will prevent you from using your e-mail. Also, do NOT put checkmarks into the "This server requires a secure connection (SSL)" options or you won't be able to connect. The "tweak" is to click and drag the "Server Timeouts" button to the far right of that little bar. If you can't figure out how to do this then don't worry but it is a helpful feature to have a long server timeout setting. Don't select the option to "Leave a copy of messages on the server" or you will quickly max out your mailbox on your ISP's server. This option also tends to lose messages so leave that option unchecked. Click OK because you're finished configuring your e-mail settings.
Hitting the OK button will bring you back to the main window below. Let's click the "Test Account Settings" button to test your e-mail setup.
Outlook 2002 will check to see if it can connect to your ISP. It will also check to see if your settings can actually reach your ISP's mail server and logon. Lastly, it will send a test message to see if everything is working.
If any of your "Tasks" don't get a green checkmark then write down which ones don't. Go to the "Setting Up An Internet Connection" section of this website if you aren't getting a connection. Otherwise, call your ISP for 24/7/365 tech support. Be sure to tell the tech that you are using Outlook 2002 (XP) and that you did a test connection which identified certain areas where you aren't able to use your e-mail. Those are the areas that didn't get a green checkmark. If you successfully tested your account settings then click the Close button. In the prior window, click the Next button and then click the Finish button in the final window. You're ready to e-mail your friends.
Disabling The Auto Disconnect & Auto Dial Options You can disable the auto disconnect and auto dial options of Outlook 2002 by clicking the Tools menu and choosing Options. If you don't see Options then click the little arrows at the bottom of the dropdown to see more options. Once the Options window pops up, click on the Mail Delivery tab at the top to see the following window. Choosing "Hang up when finished sending..." will tell your computer to disconnect after every time that it checks your e-mail. You probably don't want that option. Be careful about selecting the "Automatically dial when checking for new messages" option because your computer will try to connect all the time. This will greatly increase your online usage time when you aren't even trying to use the connection. This can cause a lot of problems.
|